
by Ron Allen and Bill McClendon
Release 2.1 published on the web March 5, 1998
Release 2.1 final changes completed March 20, 1998
Original Release 2.0 published October 1, 1996
Best viewed at 800 x 600 and 256 or more colors
|
All original works contained herein are copyright © 1996, 1998 by Ronald R. Allen Jr. and Bill J. McClendon. All rights reserved. |
This site provides access to programs and documents that are copyrighted by their respective copyright holders. No claim is made to any of these third-party materials and no infringement is intended.
Introduction
Welcome to The Unofficial WAD Designers' Handbook, Release 2.1!
This publication is intended to give aspiring Doom/Doom 2 level authors the knowledge needed to get started designing and building their own levels. Although this document will probably be of most direct use to those new to creating levels for Doom, moderately experienced level authors may also find useful information here.
If you've played one of the Doom games, discovered some of the thousands of add-on levels available on the Net, and thought to yourself, "Hey, I'd like to do that!", this is for you!
Other games, such as Heretic, also use the Doom engine and therefore this information also may apply to editing levels for those games, though not as precisely as for Doom and Doom 2. Due to major engine changes and the presence and formatting of scripting, this guide does not apply to Hexen editing.
What You Will Need
The first and most obvious thing you'll need to get started creating your own levels for Doom is a registered copy of Doom and/or Doom 2. Doom 2 was never released as shareware, so registration should not be an issue. At the request of id Software, all level editors check for and require the registered version of Doom to function. Be sure to have the latest versions of Doom/Doom 2 installed. Version 1.9 is the latest for both games.
| Software piracy is theft, plain and simple. You are strongly encouraged to pay for the software you use. The authors of this document will not take part in any software piracy. Do not email us with any questions regarding pirating Doom or Doom "warez". |
To create levels for Doom/Doom2 you will also need to acquire, at minimum, a level editor. There are many good level editors available on the net, each with it's own legion of users that swear by it.
One of the most commonly asked questions of level authors who are just starting out is, "What is the best level editor?" There is no one correct answer to that question. In fact, that isn't even the correct question to be asking. You should be asking, "What's the best level editor for me?" With very few exceptions, when you ask someone which editor is best, the answer you receive is the same editor that person uses — which tells you nothing. What appeals to one person doesn't necessarily suit another at all.
The only honest answer to the question of which is best is to say, "Try them and see." Therefore, that is exactly what we suggest you do. Download and test as many editors as it takes to find the one that suits you best.
Since there are so many different editors out there, though, you may want to use a little forethought to narrow down what editors you want to try first. Obviously, if you use a Mac you'll need an editor that works on that platform. If you use a PC, however, you have a choice between editors written for Windows or those written for DOS. If you are comfortable working with DOS-based programs, then it makes sense to start out by looking at DOS-based editors. Similarly, if you prefer Windows programs, limit your choices to those editors designed for use under Windows.
If you're curious, the authors use DOS-based DCK (Bill) and Windows-based WinDEU (Ron). Both do a fine job.
Copyright
The Unofficial WAD Designers' Handbook is copyright © 1996, 1998 by Ronald R. Allen Jr. and Bill J. McClendon. All rights reserved.
Reproduction, in whole or in part, is strictly prohibited, including publication in any medium, electronic or otherwise, for fee or for free, without prior written consent of the authors.
This document includes graphics that are the copyrighted © property of id Software, Inc. All rights reserved.
This document has not been approved, nor is it supported by, id Software, Inc. Questions or comments regarding this document should be directed to the authors, not id Software, Inc.
Changes from Release 2.0
This version of the Handbook contains numerous, but mostly minor, changes from Release 2.0. The changes are mainly aesthetic in nature, involving the rephrasing of many passages and a reorganization of much of the material. Typos and spelling errors have been corrected. There are a few corrections and expansions on material previously presented. There is also a small amount of new material based on information available only after the Doom source code was released. All appendices that contain editing reference information, such as the texture lists, action linedef types, Thing sizes, etc. have been removed from the web site but are still included in the downloadable version of the Handbook.
Glossary
Most instructional texts put the glossary at the end. We're putting at the front. Why? Because once you've got an understanding of the terminology and jargon, you've won the first and arguably most important battle on the road to becoming a Doom level author! In addition, the documentation that comes with most editors assumes that you're familiar with the information that follows. This section of the Handbook may be used to complement your editor documentation.
You'll notice that this glossary is also atypical in that is not alphabetical. Rather than an alphabetical listing, we've put this glossary in an order more appropriate to learning the basics of level authoring. Even so, the definitions of some terms are dependent on the definitions of other terms. As with almost any glossary, a certain amount of back-and-forth referencing will be necessary. We've tried to minimize that necessity.
Doom, Doom 2
These are the great games from id Software. If you don't know what these games are all about, why are you interested in learning how to author levels for them?
Seriously, though, the two games do have a few differences. In this Handbook, when there is something unique to one or the other it will be pointed out. Otherwise, when we say "Doom", we mean either game.
WAD, PWAD, IWAD
These terms all refer to the data file that the game information, including levels, is stored in. The filename extension used is .WAD, hence the name.
IWAD is the term used only for the original WAD files created and released by id Software with the doom games. The I stands for "internal".
PWAD is the term used to refer to user-created add-on WAD files. The P stands for "patch". While everything in this document technically refers to PWADs, we will use the generic term WAD throughout.
In addition to level information, WAD files may include replacements or modifications of most all of the other game elements, such as new music, new graphics, new items, etc. These types of modifications are beyond the scope of this Handbook.
Editor
The editor is the software tool used to create levels. The basic function of the editor is to allow you to manipulate the various game elements to create the levels you envision, then save the information generated in a form that may be correctly processed and loaded into the game. Different editors take different approaches to achieve this common goal, and features and sophistication in editors vary greatly.
Level
Level is a generic term that refers to a single game portion with a well-defined beginning and end. In Doom and Doom 2, a level begins with the player appearing in one location, moving forward while fighting monsters and solving puzzles, culminating in reaching an end point whereupon the player moves on to the next level.
A user-created level must replace an existing level of the game. If you want to create several levels to be played in sequence, you must specify sequential levels in the game that they will replace. At the end of the last level you replace with your own, the game automatically moves on to the next existing level in the game.
Doom and Doom 2 use different methods to identify levels.
Doom uses the Episode and Mission format. Common usage takes the form of E#M#, where "E" stands for Episode and "M" stands for Mission. A mission is an individual level, while an episode is a grouping of several related levels. The original Doom contained 3 Episodes of 9 missions each (8 regular levels plus one secret level). Ultimate Doom added a 4th Episode of 9 missions.
Levels in Doom 2 are referred to as Maps. Usage is MapXX, where a two-digit number replaces XX. Levels under 10 require a preceding 0; level 5 of Doom 2 is referred to as Map05.
Void Space
Void space, in general terms, is the area outside of the playing space of the level itself. Void space also refers to any area within the level that is completely enclosed by one-sided linedefs.
Vertex (plural: Vertices)
The most elemental level component, vertices are the endpoints of linedefs. Every linedef has exactly two vertices.
Linedef
Linedefs are the lines you draw in your editor to define every structure in Doom. Walls, windows, ledges, doors, everything in Doom is constructed from linedefs.
Linedefs define where the vertical visual component of the level you're creating is located (although not all linedefs are required to have a visual component). Perhaps the best real-life analogy would be to the internal structures of walls; linedefs are the studs and beams that hold the building up.
There are two types of linedef, one-sided and two-sided.
- One-sided linedefs are only able to be seen by the player from one side, and can only be played by on one side. An example would be an outer wall of your level, beyond which there is nothing more (or void space). The player can not pass through a one-sided linedef.
- Two-sided linedefs can be seen and played by on both sides. Examples would be windows, ledges, etc.
All linedefs have a first side, while two-sided linedefs have a second side. The first side is often referred to as the "right" or the "front" side. The second side, if it exists, is frequently referred to as the "left" or "back". This terminology is used interchangeably in various Doom reference works, most notably The Unofficial Doom Specs by Matt Fell. The terms right and left have directional connotations that may be misleading, since there is no need for a given side to point in any particular direction. The terms front and back are somewhat less confusing, but also are not very accurate because in practical terms the player will have no way of knowing if he is looking at the first or second side of a linedef. Throughout this Handbook, the sides of a two-sided linedef will be referred to as "first" and "second".
| Note: It is strongly recommended that you obtain and read The Unofficial Doom Specs by Matt Fell. That classic Doom document provides a wealth of technical information that is beyond the scope of this Handbook. |
All good editors will provide you with a visual aid to determine which sides of linedefs are pointing in what directions. This visual indicator in most editors takes the form of a small perpendicular line at the midpoint of the first side. For example:
It is essential that all one-sided linedefs have their first sides pointing in the direction that the player will play by and see. If this is not the case, then the first side of the linedef will be pointing into void space and will cause the linedef to be misdefined. If you have a one-sided linedef with the first side pointing into void space, Doom will fail to load.
As the player can see and play by both sides of a two-sided linedef, the direction the fist side is pointing is not as important. However, it will make your life as a level author easier if you are consistent in the way you place your linedefs. It has become an editing convention to keep all first sides of linedefs pointing inward toward the middle of the space being defined (called a sector).
One very important point: Every linedef you draw in a level must be defined in at least one sector (see below). "Stray" linedefs in a level will cause Doom to crash since they will be misdefined. This does not mean, however, that every linedef must be connected to another. Linedefs can be "free-floating", but they must still be defined as part of a sector. In the case of two-sided linedefs, each side must be defined in a sector (though not necessarily different sectors).
Sidedef
A sidedef is the definition of what the player sees while looking at a linedef in the game. One-sided linedefs have a first sidedef, while two-sided linedefs have both a first sidedef and a second sidedef. First sidedefs are always associated with the first side of the linedef, second sidedefs with the second.
To continue the building construction analogy, sidedefs are the sheetrock or plaster that covers the supporting structures (in this case, the linedefs).
| Note: A lot of people incorrectly use the terms linedef and sidedef interchangeably. Technically, these terms are not the same, but using one term when meaning the other is fairly common. Don't let yourself be confused by this tendency. Once you gain familiarity with these terms, you will be able to easily distinguish what is actually being referred to. For example, if someone told you that they were running electric cable through a wall, you would not need to have it explained that they were actually running the cable through the studs within the wall. Likewise, if someone said they were painting a wall, you would understand that they were painting the sheetrock or plaster, not the supporting studwork. |
Sidedefs have three distinct, separate sections called the Upper, Normal, and Lower.
The Normal is the portion of the sidedef that is between the ceiling and the floor of any given area in your level. The player always moves through the Normal. The Upper is that portion of the sidedef that is above the ceiling, and the Lower is the part that is below the floor. Why do you need to be concerned about what is above the ceiling or below the floor? Because, in Doom, the player can often see into those areas. Any place in your level where there is a difference in floor or ceiling height, the player can see the place where the difference occurs. Consider a hallway that opens out into a larger room, with a step down and the ceiling higher than that of the hall. If you picture stepping out into the room and turning around and looking back at the doorway (which is the Normal, the area of the sidedef that the player passes through), the area above and below the doorway are the Upper and the Lower of that sidedef. Here's an example:

You may assign a different texture to each portion of a sidedef. Textures are the graphic that the player sees on a sidedef in the game (see below for more information on textures and texturing your level). The Normal of a two-sided linedef is generally not textured since that is the space through which the player moves. As you can see in the above example, the Lower is the riser of a step up and has a different texture than the surrounding walls. Anytime you create stairs, you will be texturing the Lower of those sidedefs.
Sector
A sector is defined by a group of three or more linedefs that enclose a certain space that has a single floor height and a single ceiling height. The Unofficial Doom Specs define a sector as "a horizontal (east-west and north-south) area of the map where a floor height and ceiling height are defined. It can have any shape. Any change in floor or ceiling height requires a new sector (and therefore separating linedefs and sidedefs)."
As the level author, you have to tell Doom which linedefs are part of — define — which sectors. Most editors allow you to create levels one area at a time by placing linedefs. The editor will define the sectors for you as you go along, although not always correctly or as you want them to be defined. Any editor should have the capability to manually alter the sector assignments. Consult the documentation for your editor to determine how to define sectors.
Every part of your level that the player may see or play in must be defined as a sector. Any place where you define a change of ceiling or floor height must also be the boundary between at least two sectors.
- Every step in a staircase is a separate sector
- Every door is a separate sector
- Each window must be defined as a separate sector
- Each free-standing structure, such as computer consoles or a pedestal must be a separate sector
In many cases, such as with freestanding structures in your level like pedestals or computer consoles, you will define sectors within other sectors. It is in those cases in particular that you will need the capability to manually edit sector assignments.
Sometimes it's necessary to not define an area as a sector. For example, if you have a free-standing floor-to-ceiling structure that has solid walls — a pillar, perhaps — that the player will never walk through, it is best to not define it as a sector (or delete it as a sector if your editor assigns a sector definition to it automatically).
- Inside a sector: Enclosed by that sector but not subject to the floor/ceiling height, lighting level, or special effects of that sector
- Part of a sector: Enclosed by that sector and subject to the settings of that sector for floor/ceiling height, lighting, and special effects
Here's an example as seen in an editor. The above illustration shows a square room with a step down into an octagonal area in the center. At the center of the octagonal area is a square floor-to-ceiling pillar.
The large square of the room, formed by the outer walls, is defined as a sector (sector 0, in this case). The octagonal area, which has a difference in floor height, is defined as a separate sector (sector 1) within the larger sector of the room. Another way to describe this is to say that the first sidedefs of the eight linedefs that make up the octagonal area, which are all pointing inward toward the pillar (although this isn't shown), are defined as being in sector 1 (the sector of the octagonal area). The second sidedefs of those same linedefs are defined as being in sector 0, the large square area of the entire room.
The small square in the middle is a floor-to-ceiling pillar. Since this is a floor-to-ceiling kind of structure that the player will never walk through, there is no need to define it as a sector. The linedefs that make up the pillar are one-sided, with their first sides pointing outward into the room. The area inside the pillar is void space.
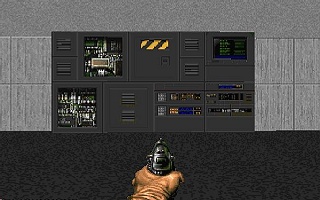
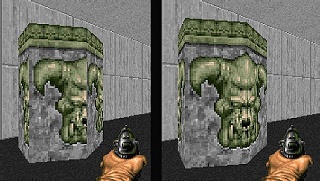
Here is how this small example level looks in the game:

Note that graphic on the floor of the octagonal area, called a flat (see below for more information on flats), is different than that of the surrounding floor. Floor and ceiling flats, as well as lighting levels and effects, are all assigned by the sector.
Texture
Textures are the graphics that Doom applies to vertical (walls, etc.) surfaces, or sidedefs. With the exception of certain special effects, all visible surfaces must have a texture assigned to them. This includes all surfaces in the game that are not initially visible but could become visible during game play, such as the walls behind a lift for example. A visible surface in the game that does not have a texture applied to it will result in the infamous HOM, or Hall Of Mirrors, error. Many editors have a consistency checker or some kind of warning system that will alert you if there are any sidedefs missing textures. However, many times the warning system will fail to tell you about missing textures on sidedefs that are not initially visible in the game.
Textures come in two flavors, single-patch and multi-patch. The difference between the two types is that the single-patch textures are made up of a single image, while multi-patch textures are made up of graphic elements from two or more sources.
For the most part, you don't need to worry about whether a texture is single-patch or multi-patch. One exception is when you are texturing the Normal of a two-sided linedef. There are several single-patch textures that include areas that the player can see through in the game. These textures are also known as the transparent textures. Single-patch transparent textures may be applied to the Normal of a two-sided linedef to create the illusion of windows.
There are two error conditions associated with using single-patch and multi-patch textures improperly. If you apply one of the transparent textures to the Normal of a one-sided linedef, you will create the "Tutti-frutti" error, caused by Doom having no graphic information to display in the transparent areas. If you apply a multi-patch texture to the Normal of a two-sided linedef you will cause the "Medusa Effect", an ugly error that will also slow your computer almost to a halt while being displayed.
Textures can be "nudged", using x-offset and y-offset (see below). This process is called aligning the textures, and can be a very time consuming, tedious process. The importance of aligning textures will be mentioned several times throughout this Handbook. Properly aligned textures are vital to creating a realistic, believable world for your players. Textures that are not properly aligned will completely spoil the realism and believability of your level, and is the single most common error made by level designers.
X-offset and Y-offset
These two terms refer to the "nudging" of textures. The importance of correctly aligned textures to level design simply can not be overstated. Perfectly aligned textures can make an otherwise mediocre level at least look professional, while even a single misaligned texture can completely spoil an otherwise brilliantly designed WAD.
To understand how x- and y-offset work and why you need to be concerned with them, you need to understand how Doom draws the textures during play. When Doom draws a texture on the Normal or Lower of a sidedef, it begins in the upper left corner (as you face the sidedef in the game) and draws a horizontal line, one pixel tall, from left to right. When that line is finished, Doom comes back to the left side and draws another one pixel horizontal line immediately below the first. This process is continued until the entire portion of the sidedef in question is completely covered or the entire texture is drawn. Every time a new sidedef starts, Doom starts the texture drawing process over again. Textures drawn on the Upper are drawn in the same fashion, but from the bottom up.
If the size of the sidedef is the same size as the texture you apply to it, say 128 x 128 (that is, 128-pixels tall by 128-pixels wide), then the texture will exactly fit the sidedef. No problem there.
What happens if you have, for example, four sidedefs side by side that are 128 pixels tall but only 32 pixels wide and you want to use the same 128 x 128 texture on the entire area? The width of the whole is still 128 (32 times 4), but, remember, Doom starts drawing the texture over again on each new sidedef. The result of simply using the same texture on all four sidedefs will be the leftmost 32 pixels of the texture will be repeated on all four sidedefs. This is likely not the effect you are looking for.
The solution is to use x-offset. What x-offset does is to tell Doom, "Instead of drawing this texture on the sidedef as usual, I want you to start drawing it x number of pixels to the right." Using x-offset, you force Doom to draw the texture on each sidedef in such a way that the four 32 pixel wide sidedefs will appear as a seamless, unbroken texture.
- The x-offset of the leftmost sidedef will be 0 (no change). Since this is the leftmost sidedef, Doom will already display the texture as desired.
- The x-offset of the next sidedef to the right will be 32. This will cause Doom to start drawing the texture 32 pixels over from where it normally would, or, in this example, at the exact point where the texture on the first sidedef left off.
- Similarly, the x-offset of the third sidedef will be 64 and the x-offset on the fourth sidedef will be 96.

This texture, COMPTALL, is 256 pixels wide, but it is applied to four separate 64 pixel wide sidedefs side by side and all x-offsets left at 0. As you can see, the first 64 pixels of the texture are repeated on each sidedef and the result looks awful.
After using x-offset as described above to correct this problem, the texture looks a lot better:
This is only one example of the use of x-offset. You can also use x-offsets to "bend" textures around corners, for example.
X-offset, and y-offset as well (see below) can be used in many ways to make your levels look exactly the way you want them to. Here's another idea: You can use x- and y-offset to selectively use only portions of textures on sidedefs that are smaller than the texture. The texture COMPTALL (used in the two example illustrations above) has a section at the right end that includes a view screen and some controls. If you just want to use a part of the texture, say the view screen, you can use x-offset and y-offset to put the view screen where you need it on a carefully sized sidedef.
Y-offset works the same way as X-offset, but moves the texture vertically instead of horizontally. There generally isn't as much need for Y-offset as for X-offset, but it can be very useful and in some cases necessary.
Both x-offset and y-offset can be either a positive or negative number.
- Positive x-offset moves the texture to the right. Negative x-offset moves the texture to the left.
- Positive y-offset moves the texture up. Negative y-offset bumps the texture down.
You can achieve identical results from using either positive or negative values when you are offsetting textures. For example, if you want to use the rightmost 64 pixels of the 256 pixel wide COMPTALL texture on a 64 pixel wide sidedef, using an x-offset of either 192 (256 minus 64) or -64. The end result will be the same. Many level authors always use positive offsets, while others use a mix of positive and negative values. For all practical purposes, Doom doesn't care in the least which way you decide to go.
Pegged/Unpegged
This refers to another quality of how Doom draws textures on sidedefs that you can, and in certain cases must use to create certain effects. Normally, textures are pegged but any editor can unpeg them. In fact, some editors have the ability to automatically unpeg textures when appropriate (however, this function is not always reliable).
| Note: This section is heavily drawn from Managing Textures and the "Unpegged" Attribute by Scott Amspoker. It is recommended that you read the original for a more in-depth explanation. |
What is unpegging? In simple terms, unpegging a texture tells Doom to draw that texture exactly backwards from how it would normally be drawn. Unpegging the Upper affects only the Upper, while unpegging the Lower affects both the Lower and the Normal. You can not unpeg the Normal alone. When you unpeg the Lower, Doom will draw that texture from the bottom up, in one-pixel tall lines from left to right. The upper texture, normally drawn from the bottom up, will be drawn from the top down if unpegged.
Consider a situation where you are applying a 128 pixel tall texture to the Normal of a one-sided linedef that is also 128 pixels tall. The texture exactly fits the sidedef (we are ignoring the widths of the texture and sidedef here), so nothing more needs to be done.
Now consider the case of applying the same 128 pixel tall texture to the Normal of a linedef that is taller, say 160 pixels. Doom will begin at the top left corner and fill the sidedef with the texture. When the entire texture is drawn, there will still be an additional 32 pixels at the bottom that needs to be filled. In this situation, Doom will begin drawing the same texture again, filling in that section with the top 32 pixels of the texture. This is called tiling.
What if you want the 32 pixel tall band of texture to be drawn at the top instead of the bottom? Unpegging the Lower (which affects the Normal) will cause the texture to be drawn from the bottom up rather than the top down.

In the above example, the texture COMPSTA1 is Lower unpegged on the right and not unpegged on the left. As you can see, Lower unpegging causes the texture to be drawn so that it aligns with the texture next to it that is on a shorter sidedef. The left side clearly shows the tiling effect. The right side is tiled also, but the way this texture was designed allows a 32 pixel tiling at the top to look good.
At this point you might be wondering why unpegging is important since the same effect described above can be accomplished using y-offset. Y-offset affects all portions of a sidedef, Upper, Normal, and Lower. Unpegging affects only that portion of the sidedef that is unpegged. It is important to note, however, that while x- and y-offsetting affect each sidedef of a two-sided linedef separately, unpegging works on the entire linedef. You can not Lower unpeg just one side of a two-sided linedef.
The most common use of unpegging is when making windows. To make the textures above and below the window align with the textures on the surrounding walls they must be unpegged. Using y-offset just won't work.
Flats
Flats are very similar to textures, but are applied to horizontal surfaces (floor, ceiling, railing top, etc.) in the sector definition (not in the sidedef definition, as with textures). Like changes in floor/ceiling height, any time you want to make a change in flat you must define a new sector.
Unlike textures, flats appear on the horizontal surfaces in a continuous north-south orientation. What that means is that you never have to worry about aligning flats because Doom does that for you. There is no way to offset flats, which is both good and bad. Not needing to spend tedious hours aligning flats is good. The downside is that a large number of flats have a distinctive pattern that look great when your walls align to them, but look awful when they don't. For example, some flats have a pattern that looks like lighting fixtures. If you use those flats in a room that isn't exactly aligned to the flat, you may have a row of lighting panels that are cut off right down the middle. This looks bad and ruins the realism. However, if you look through the original Doom and Doom 2 levels created by id Software, you'll notice cases of patterns on flats being cut off by walls and other inconsistencies. Players are generally a bit more forgiving about flat alignment problems than they are about texture misalignments, but it is a good idea to keep any unrealistic effects in your levels to an absolute minimum.
Since there is no way to offset flats, you must instead align your walls. All flats are exactly 64 x 64 pixels. By placing all of your walls on the 64 x 64 grid in your editor, you can easily and quickly ensure that all flats align perfectly with the first try. With a little forethought and careful selection of flats, you can avoid problems in areas that you want to create that don't naturally align to the flats.
The teleport pad graphics are also flats, so it is vital that you plan any areas which include teleport pads so that the pad itself can fit exactly on the 64 x 64 grid.
As with the terms linedef and sidedef, many people use the terms texture and flat interchangeably. Don't let that style of usage confuse you.
Tags
There are many moving structures in Doom that the player can activate, such as doors, lifts, and switches. The player moves up to a switch, for example, and "uses" it (by pressing the space bar). The switch flips and something moves; a floor, perhaps, across the room raises. The level author accomplishes this by associating the linedef of the switch with the sector of the rising floor. This association of linedef and sector is called tagging.
A tag is simply a number that is assigned to both the linedef that is the trigger for the action and the sector where the action takes place. It is important to understand that tags are always made between linedefs, which serve as the activation points, and sectors, which are the points of action. Lindedefs can not be tagged to linedefs or sectors tagged to sectors.
Most level editors will assign tags for you in numeric order, if you want them to, but the numeric order of tags is irrelevant. linedefs and sectors are not assigned tag numbers by default. Only those linedefs and sectors that you designate as having some function together will be assigned tags.
The simplest case of tagging would be a single linedef being tagged to a single sector, such as the switch that raises a single floor mentioned above. You are also able to tag multiple sectors to a single linedef by using the same tag for all. That single switch could cause a set of ten pillars (each a separate sector) to rise out of the floor, for example. Likewise, you may tag multiple linedefs to a single sector.
In addition to assigning the same tag to both a linedef and a sector, you must also assign the action that will be performed on the sector when the triggering linedef is activated in the game. While different editors group these functions in different ways, they can be loosely broken down into six types:
| Doors | Opens doors |
| Raise Floors | Raises floors |
| Lower Floors | Lowers floors |
| Ceilings | Various ceiling movements |
| Moving Things | Lifts, rising stairs, etc. |
| Specials | Teleporters, end of level activators |
The player can activate the action linedefs in one of three ways, switch, walkover, or gunfire. Not every action has all three activation types available. Each action can only be activated in only one way, which is chosen by the level author. The switch activation type is assigned to a linedef that the player walks up to in the game and "uses" to trigger the action. Walkover activation types are assigned to linedefs that the player is able to walk over, which triggers the action. Gunfire activation types are triggered when the player shoots the linedef with the pistol, shotgun, or chaingun, or uses the chainsaw or the punch on it. Rockets, plasma, and the BFG will not trigger gunfire-activated actions.
A common question that Doom editors who have acquired a moderate amount of experience tend to ask is in regard to the possibility of changing action/activation types in the middle of the game. Another typical question is about having random tags assigned to certain linedefs and/or sectors when the game begins, or changing randomly during game play. The answer to these questions is, it is impossible. With a little creative thought, most of the effects that level authors want to create when they ask these questions can be achieved. Perhaps not in exactly the way they were originally envisioned, though.
Things
"Things" is the generally accepted term for the items found in the game. Things are loosely grouped into nine categories:
| Player | Player 1-4 starts, Deathmatch starts, Co-op starts, Teleporter exits |
| Weapons | Shotgun, chainsaw, etc. |
| Enemy | Imps, demons, soldiers, etc. |
| Bonus | All the power-ups, such as the Soul Sphere, Medikits, etc. |
| Keys | Red, yellow, and blue keycards and skull keys |
| Light Sources | Torches, lamps, etc. |
| Bodies | Includes pools of blood, dead soldiers and players, etc. |
| Hanging Bodies | More of the same, but hanging from chains |
| Decorations | Pillars, columns, trees, etc. |
All Things have three attributes that can be set by the level author: difficulty level, facing direction, and the deaf attribute.
Difficulty level refers to the difficulty level that the player chooses to play the game at. There are five difficulty levels in Doom (too young to die, not too rough, hurt me plenty, ultra-violence, and nightmare). Each Thing can be set to appear only on certain difficulty levels, but there are only three difficulty levels that they can be set to. The three difficulty levels that can be assigned to Things are:
| 1+2 | Thing appears in too young to die and not too rough |
| 3 | Thing appears in hurt me plenty |
| 4+5 | Thing appears in ultra-violence and nightmare |
In most editors, all Things are set to appear in all difficulty levels by default. It is up to you to manually change the difficulty level that Things appear in. The difficulty settings of Things deserve a good deal of thought on your part as the level designer.
The most obvious use of difficulty settings is to increase or decrease the number of monsters that appear in the game. You might, for example, create a room that contains three imps on difficulty 1+2, five imps on difficulty 3, and eight imps on difficulty 4+5. You could also use difficulty settings to change the types of monsters that appear. That same room could, instead, contain three imps on 1+2, three imps and a demon on 3, and three imps and a Baron of Hell on 4+5. These are perfectly reasonable approaches to setting the difficulty of your level.
Since all Things, not just the monsters, have a difficulty setting, other approaches are possible. For example, consider a room containing 10 imps. You could give the player a chaingun to use on difficulty 1+2, a shotgun on difficulty 3, and make them use just the pistol on difficulty 4+5. Or you could give them a shotgun on all difficulty settings, but give them 3 boxes of ammo on difficulty 1+2, 2 boxes on difficulty 3, and only one box on difficulty 4+5. Or you could give the player the same weapon and ammo on all difficulty settings, but set the amount of health available so that the level is easier or harder to survive as appropriate to the difficulty. You could also opt for a myriad of combinations of the above difficulty setting techniques.
A very useful program, called TCOUNT, has been created to give you an idea of the relative difficulty of your level. TCOUT will analyze your level and report back to you on the ratios of monsters to ammo to armor to health.
There is yet another possibility that difficulty settings open up for level authors. If you include doors that open only when the player possesses certain keys, you can make your level play almost completely differently based on the difficulty setting. By setting the difficulty that the keys themselves appear in, you could have a key appear in one location on difficulty 1+2 and completely different locations on difficulties 3 and 4+5. In this way, you can force your players to take totally different paths through your level depending on what skill level they play at. An example of "key switching" difficulty settings can be found in 3X-PLAY.WAD by Bill McClendon.
Facing direction is one of eight compass points — north, south, east, west, northeast, southeast, southwest, northwest — that the Thing will face when the level is started. With regard to all Things except the player starts, the teleporter exits, and the monsters, facing direction is completely without meaning. In the game, all Things except the monsters always appear to be facing the player.
The facing direction of all player starts (single player 1-4, Deathmatch, and co-op) is the direction the player will be facing when spawned. This characteristic can be used to some effect by the level author, for example by having the player facing away from a group of monsters when spawned. Similarly, the facing direction of teleport exit Things is the direction that any player teleported to that exit will face when they are teleported (regardless of whatever direction they might have been facing when they entered the teleporter).
The facing direction of monsters is the direction they will face when the game starts. Monsters will not "wake up" and begin attacking the player until alerted to the player's presence by sound or by sight. Monsters have a 180° field of vision. They are able to see everything they face, from directly to their left all the way around to directly to their right. Monsters also have a limited field of vision directly to their behind of approximately 30°. The next time you see a monster with its back to you, try to sneak right up behind him and pop him in the head. Just before you get there, he'll wake up and turn around. Monsters also see perfectly in complete darkness. The direction that monsters are facing when the player enters an area will be one factor that determines when they will wake up and begin hunting.
The deaf attribute determines whether or not a Thing can be made aware of the presence of the player through sound alone. Obviously, this attribute is totally without meaning when applied to anything but the monsters.
From the player's point of view, sound in Doom diminishes with distance and attenuates depending on intervening walls. This is a very realistic way for sound to be handled. Monsters, on the other hand, always hear perfectly! If there is a physical path for sound to travel from the player's location to a particular monster's position, that monster will wake up and begin hunting at the first noise — no matter how distant.
The monsters can hear all weapons fire, including the punch. Monsters can not hear the sounds made by the player picking up ammo and power-ups or opening doors. As unrealistic as it may be, the monsters can not hear the chainsaw at idle, but can hear it when it is revved up for attack.
There is a linedef type called "blocks sound". This linedef type has been a major source of confusion to Doom editors. This linedef type is meant to block sounds from the player, not the monsters. In addition, this linedef type completely blocks sounds only when used in pairs; it takes a set of two between the player and sound source to totally mask out the sound.
Each Thing placed in a level takes 10 bytes to store, and Doom is only able to store 8K worth of things in any one level, so the most Things you can have in any single level is 800. That sounds like a lot, and in reality it usually is more than enough for average-sized levels. However, you might be surprised at how many Things you end up putting into your levels, and as levels grow in size you may find yourself approaching the 8K limit. Another limitation in Doom with regards to Things is that there may only be 64 Things visible in the game at any time, and that includes killed monsters. When the player is potentially able to see more than 64 Things at any time, some of the Things will disappear or seem to flash on and off. This looks really bad, although it won't crash the game.
Sprites
Now may be a good time to tell you that "sprite" is the technical term for Things. In addition, the players weapon graphic is also a sprite. Sprites are essentially the textures that make up the Things (and the player's weapon), but this is a very oversimplified explanation. A more detailed discussion of sprites is beyond the scope of this Handbook, and would be irrelevant to level design in any case.
Nodes, Node-tree, BSP-tree
Nodes are extremely important for the level designer to be aware of, but, thankfully, you don't have to delve into the technical details of what nodes are and how they are built in order to design levels. If you would like a more-in-depth explanation of nodes, consult The Unofficial Doom Specs. Here's the gist of what you need to know about nodes as a level author:
Another name for nodes is BSP or BSP-tree. The letters "BSP" stand for binary space partition. Nodes are Doom's way of determining what the player is able to see from any given location in the level. Every WAD must have a node-tree built in order for Doom to be able to run it. If the nodes are missing or corrupt, Doom will crash when you try to run the level.
Before you run your levels, you must process them through a node builder. Most level editors have a built-in node builder, and most do an adequate job. However, the more complex the level, the more complex the node building becomes. You may find that the node builder included with your editor isn't sophisticated enough to properly build the nodes for your level after it reaches a certain (and sometimes surprisingly low) degree of complexity. To address this problem, several different stand-alone node builders have been developed. In general, a stand-alone node builder will be able to handle a much higher degree of level complexity than the ones included with most editors. Two of the best node builders available for Doom, which the authors use and recommend, are BSP and ZenNode.
Typical symptoms that appear when you need to use a more sophisticated node builder are things like solid walls that can be walked through, thin air that blocks movement, sections of walls that seem to disappear, and other oddities. If you encounter these are other similar problems, the node builder is the first place to look for a solution.
Blockmap, Ssectors, Segs
More technical terms used in the node-building process that are beyond the scope of this Handbook to properly define. None of these terms are of any practical importance to the vast majority of level authors, and are included here for the sake of completeness. You may see these terms in other Doom documents, so you should at least be aware of them.
Reject, Reject Table, Reject Map
This is another technical aspect of Doom level creation that is actually beyond the scope of this Handbook. However, as having a proper reject table for your levels directly affects the playability, some detail is provided here.
| Note: This section is heavily drawn from the readme file for RMB, a reject table builder for Doom by Jens Hykkelbjerg that is very highly recommended. The authors of this Handbook strongly feel that no level should be released to the public unless it has had a reject table built for it using RMB. Yes, it's that good. |
At every moment while playing Doom, the game must calculate the location of the player(s) and every monster in the level to determine if a monster can see a player. Doom does this for every monster in the level and every player every processing cycle. This is in addition to everything else the game has to do. Other things the game must do include determining what the player can see, applying and displaying textures, checking to see if any doors or other items have been used by the player(s), taking the appropriate action if any have, determining if the player or a monster has fired a weapon and, if so, where the shot went, calculating any damage done to player(s) or monsters, and so on. That is a lot of calculations being performed in a very short time, from a human point of view.
What the reject table does is provide a pre-calculated set of values to relieve some of the burden from the Doom engine during play. Instead of making a large number of LOS (line of sight) calculations during the game to see if any given monster has seen the player(s), most of those calculations can be made before the game even starts and stored in the level itself. If that has been done, instead of performing a lot of complex calculations Doom only has to look up the relative locations of the monsters and the player(s) to determine if a monster should wake up and begin hunting. That information is stored in the reject table. A proper reject table has the effect of speeding up the game, in some cases to a significant extent, especially when playing on a slower computer or in levels that contain a lot of monsters. Pre-calculation of a reject table also has the advantage of being more accurate than the calculations Doom would have to make "on the fly" during the game.
Doom requires that a reject table is present in every level or it will crash, so the node builder creates the reject table along with the nodes. However, Doom does not check to see if the information in the reject table is accurate; simply having a reject table present in the level is enough for Doom. As a result, most node builders create nothing but the minimum reject table required — one filled with zeros. Obviously, an empty reject table is totally without value. To build a proper reject table, and thereby increase the smoothness and playability of your levels, you must use a stand-alone reject table builder (such as RMB, mentioned above, one of the very few stand-alone reject table builders in existence)
Style Guide
You now should have a grasp of the terminology and at least an inkling of the mechanics of building a level. Terminology and technical knowledge are only half of designing great Doom levels. The other half is the artistry of level design. Level authoring is an art, that much is indisputable. No one can teach you how to be artistic, especially not in as specific a way as designing levels for Doom. What we can do is outline what types of things do work and what things don't. It should be stated up front that much of this style guide is opinion. There are really no absolutes in the artistry of level design. What it comes down to is, if you are happy with your result then that is ultimately what is important.
However — and it's a pretty big "however" — if you are designing your levels with the idea of releasing them to the public, you will find that your efforts will be met with a much higher level of acceptance and approval if they do meet certain standards and guidelines. This section is an exploration of those standards and guidelines. By using the information presented you will be able to avoid what most Doom players consider stylistic errors.
Following these guidelines will help you create a level that looks good and is more realistic. Those are important issues, to be sure, and much of this material is focussed on those aspects of level design. However, the overriding issue, that permeates all other issues, is that of playability. No matter how pretty your level is, it will fail if it doesn't play well. No one can tell you how to make your level more playable. Among other things, that depends too heavily on the physical structure of each individual level to define in general terms. The best advice is to remember that, as the level designer, you are in effect playing the role of the monsters. Design your levels with this in mind, but always give your players a fair chance.
Theme
The word "theme" could easily be substituted in this context with "subject" or "motif". One of the most important requirements of creating good Doom levels is to start by deciding on the theme. The theme of your level will determine the kinds of structures that will be found, the types of monsters that will be encountered, the textures that will be used, and, in many cases, even the general flow of the level. Some possible levels themes, all to be found in the original levels of the two Doom games:
- Military base
- Laboratory complex
- Possessed city
- Supply depot
- Cave system
- Spaceport
That list represents only a tiny fraction of the possible themes you might choose. Almost any setting and scenario may be created in the Doom universe. User-created levels have taken Doom players to abandoned train stations, typical modern-day residential areas, churches, shopping malls, office buildings, and, in at least one case, a fast-food restaurant.
You are limited, to a certain extent, by the textures available in the game. Although the textures included in the Doom games are surprisingly versatile, they simply can not be appropriate for all locations and themes. New textures can be created and used by the author, but this is an advanced technique that isn't covered here.
Deciding on a theme almost automatically decides certain other factors for you. For example, if you have chosen a modern or futuristic military base theme then you will be including such things as barracks, computer rooms, and guard posts. You almost certainly will not be including bowling alleys, majestic cathedrals, or an old-west saloon. The textures you will be using will include many of the metal and computer graphics, and very few or none of the wood and stone type. It really doesn't matter what theme you select, as long as you maintain that theme consistently throughout the level.
Storyline
Storylines are the background information that many level authors include in the text file they distribute with their level. A storyline can serve to set up your level and establish the theme. You may decide to set one or more goals for the player to pursue in the storyline, or drop hints about what the player will encounter in the level. The storyline may be used simply to pique the curiosity and raise the interest level, or it can give important clues to help players survive the level.
The opinion on the importance of the storyline varies widely among players. Many people feel that a storyline is of prime importance and is what gives a level purpose. Just as many people, if not more, look on a storyline as a waste of time and never bother to read them. If you do choose to include a storyline, be sure that it isn't used as a tool to cover poor level design or theme inconsistencies. Most people just won't buy into your story explanation about why your level ended up with both a bowling alley and a western saloon in the middle of the parade ground of the military base, no matter how cleverly written it may be. Also, since a sizable portion of your audience won't read the storyline to begin with, you shouldn't use it to provide vital information that would be absolutely required to survive or exit the level.
Realism
As important as having a definite theme in mind and maintaining that theme throughout the level is, be cautious about taking it too far. Many people have tried to duplicate real-life items and structures as closely as possible, with very poor results on average. Often, the best results are obtained by strongly suggesting the theme of your level without getting too caught up in whether a structure is actually logical in a real-life sort of way or not.
The issue of realism will be raised often in the following sections. We need to define what we mean by realism in terms of Doom.
Doom is not a realistic game. After all, when was the last time you took a teleporter somewhere, then had to slug your way through a bunch of shotgun-wielding grunts and fireball-spewing imps when you arrived? When was the last time you took a shotgun blast full in the face and reacted only by seeing a flash of red in your peripheral vision? After that double-barreled blast that made you see red, did you actually think, "Gee, I'd better find a medical kit. There's got to be one lying around on the ground around here somewhere"?
Doom is, however, to use an overused and abused word, immersive. It is realistic enough that most people are able to suspend their disbelieve and get involved in the Doom world as if it were real. Achieving the look and feel that people can accept as real, and escape into for awhile, is what your goal as a level designer should be.
Unfortunately, there is no practical way to explain or even define exactly what that Doom-style realism is. All that can be said with certainty is that when a level doesn't have it, Doom players know it. Your best learning tool for becoming a good level designer is to be first a player. Play every level you can get your hands on. If you find yourself immersed in a level, go back and study it to see what the author did right... then emulate it. If you find that you just can't get into a level, try to determine what exactly is causing the difficulty so you can avoid it. Look carefully and critically at the structures other level authors have created and ask yourself if they "look right".
Another way to describe Doom realism might be to call it "internal consistency". Structures don't have to be realistic to make sense in your level. For examples of this, take a careful look at E1M1 through E1M7 of the original Doom. In Ultimate Doom, check out E4M2 and E4M6. In Doom 2, try map01, map05, map11, map21, and map23. All of these levels make no sense, in whole or in part, in a real-life sense. Within the context of Doom, though, they not only make perfect sense, they are also great levels to play. In the opinion of the authors, these levels epitomize the Doom playing experience.
Textures
As mentioned above, the theme of your level will dictate, to some extent, what types of textures you will be using. In addition to a general theme for your level, it's also important to decide on a visual theme. The easiest and arguably best way to establish a visual theme for your level is to settle on one texture that is used consistently throughout your level. This approach is easier on you, the designer, since it doesn't require that you constantly make texture changes in your editor. In addition, it provides a sense of continuity throughout your level. Of course, room after room with the same texture would quickly become monotonous — to you and the player. You must frequently break up the theme texture by using other textures as well. In fact, you can use a change in texture to give a subtle visual clue to the player that something important is coming up. Another possibility is to have different areas of your level have different theme textures, with a heavy dose of your overall theme texture throughout all areas. The key is to select textures that have the same basic theme that may be used in combinations that are both appropriate to the scenario you're creating as well as visually pleasing when used together.
Note that "trim" or "gloss" textures — room separators, structural beams, door and window framing, etc — are extremely helpful in adding to the realism of your level. For example, check out how much the SUPPORT2 texture is used as a room separator in the original Doom, E1M1 through E1M8. When you move from one room to the next or from one area to the next, it's probable that a SUPPORT2 texture will be used at the separation point. It's purely decoration, but it makes the areas more believable and serves to smooth texture transitions.
Giving the players a sense of visual continuity is important. Jarring texture transitions, unless done for a very good reason and handled carefully, should be avoided as a general rule. It's a good idea to avoid mixing textures with clashing themes. For example, the "hell" textures (skin walls, skulls, etc.) just don't blend well with the high-tech textures (computers, view screens, etc.) So keep the hell out of the computer room!
Using textures appropriate to your theme is very important, but just as important, or even more so, is that you carefully align all of your textures. This issue is mentioned several times in this Handbook, but it is so vital to creating good levels that it bears repeating. In fact, the importance of texture alignment simply can not be overstated.
Consider, for a moment, walking into a real-life building such as, for example, a doctor's office. What would you think if you walked in and saw the wallpaper in the halls had been put up haphazardly, with no regard to matching the pattern from one sheet to the next? You'd probably wonder about the competence of the contractor who put the wallpaper up, wouldn't you? That is exactly the same reaction that someone who loads a Doom level with textures that are misaligned has, and you are the contractor whose competence is in question.
In Doom, though, misaligned textures take on much more significance than simply being ugly. As a level author, you are only successful when a player completely loses himself or herself in the world you've created. To continue the example from above, if you walk into the doctor's office and the wallpaper is perfect, do you even notice it? Probably not. You accept it as a feature of the world you're in and go about your business without giving it a thought. That is the goal you must try for when aligning textures in your level. Anything less not only looks bad, but will also yank your player's minds back to the reality of sitting in front of a computer playing a game. A bad wallpapering job in an office may be ugly but essentially harmless. A single bad texture alignment in Doom can spoil the experience of the entire level.
Structures
Another way to create and maintain a visual theme is to use similar structures throughout you level. This practice reflects, as so many good WAD-building techniques do, the similar practice seen in real-life buildings. The next time you are in a large, modern building of any kind, look around — really look — and you'll see that the architects probably used the same style of window, the same style of staircase, etc to give their creation a visual theme. There may be slight changes in design from area to area, providing a visual sub-theme to each area, yet the basic theme is kept intact. Most people do not notice such visual consistency, except on a subliminal level. The same principle will serve you well in your level building.
One way to decide on a good visual theme for your level is to determine what kind of structures will be most prevalent in your WAD. Will your level have a lot of staircases? Quite a few windows? Lots of doors? Whatever structure you will be including the most of in your level, try to come up with a distinctive way to make that structure unique to your WAD. Then include that distinctive construction in virtually every single instance of that structure.
For example, let's assume you're going to have a lot of staircases in your level. Rather than making every stair a plain rectangular sector, perhaps it would be nice to make every other step a triangular shape. If you like doors, how about making every doorway up one distinctively shaped step on both sides? Are windows your thing? OK, instead of the usual rectangular windows with the usual accepted proportions, how about several tall thin windows side by side instead? These are just a few possible suggestions. Try to come up with something that both fits your overall theme and is practical.
Dimensions
Lots of big rooms can be fun, but very large rooms require a lot of monsters to adequately "defend" them. Lots of monsters can slow the game down, and too many monsters in any given area can cause the Doom engine problems displaying them all. Remember, there is an upper limit of only 64 Things that can be displayed at any time, including all Things used for decoration, lighting sources, and dead bodies including those of monsters that the player has already dispatched. In large areas that are defended well, the Thing count can approach 64 very quickly.
On the other hand, slogging through a bunch of tiny rooms is very annoying to most players. Small rooms don't offer the player anywhere to run to when a strategic withdrawal becomes necessary. In addition, small rooms don't give you, as a level designer, much space in which to add the little touches that add so much to the atmosphere you are trying to create.
The best levels tend to have one or two large areas (not necessarily the main focus of the level) linked by many medium or average sized spaces, and then, possibly, a few small rooms here and there for good measure.
While considering room dimensions, don't forget to consider elevation changes. There's nothing more frustrating for a player than being pelted over and over by a shotgun sergeant on a high ledge that can't even be seen, much less shot back at.
Lighting
This section could be the single most important section of this entire handbook. Lighting is the most underused, overlooked, and generally ignored of level design issues. Yet lighting is of prime importance in creating realistic, believable levels.
Striking the right balance of light level is one of the most difficult things you must do as a level designer. One thing that makes setting lighting level so difficult is that the player has access to the gamma correction function as well as to the brightness and contrast controls of their monitors. In a practical sense, you have no control over how your lighting will look to the player. You can work hard to get the exact degree of gloom you want in a level, but other players simply won't see the same thing you do. Unless they have the exact same make and model of monitor that you do, set to the exact same brightness and contrast, and have Doom set to the exact same gamma correction settings, there is no possible way that they could.
Although it seems obvious, make your lighting level appropriate to the situation you're designing. There are too many levels out there that have indoor and outdoor areas with the same lighting level. However, everyone wants a fighting chance. It might be appropriate in some situations to set the lighting level very low. Just remember that monsters can always see perfectly, regardless of the lighting level. If your levels are too dark, you are putting your players at extreme disadvantage. The disadvantage of fighting in the dark can not effectively be balanced by including more health and ammo in the level since the player won't be able to see to pick it up. Also, nobody likes having things jump out of the dark at him or her; that is a basic characteristic of human beings. You can use this technique to generate a reaction in your players, but this technique should be used very sparingly.
You can set the lighting level in Doom on a scale of 1 to 255, in increments of 1. A good general rule of thumb is to think of 255 as bright sunlight, and use that setting only in highest light level only in outdoor areas (or areas that would be as bright as outdoors). Unfortunately, thinking of 1 as being complete darkness isn't practical. In fact, a lighting level of 100 is very dark, and anything under 80 is almost pitch black even with gamma correction at the highest setting. A good general inside light level is about 144. Doom as a whole, not just the lighting level, works best in multiples of eight. Some suggestions for lighting levels in various conditions:
| Outside areas | 208, 192 |
| Bright inside areas | 168, 176 |
| Gloomy inside areas | 112, 128 |
| Really dark areas | 88, 96 |
Lighting level in Doom is set by the sector; the lighting level is constant at all points of each sector. There are no shadows cast by lights in Doom, which is highly unrealistic. Most Doom players are able to overlook this lack of realistic lighting, and most Doom level designers have essentially ignored the lack of shadows. However, with careful attention to detail and planning, you can take your level to a higher plane of realism through adding shadows to your lighting. Shadows are separate sectors that you build into your levels that are set at a lower lighting level to simulate shadows. This technique has many drawbacks, in particular the fact that the "shadows" you create in this way are in effect throughout the entire sector, including the upper walls and ceilings even when that is not appropriate. Judicious use of this technique can greatly enhance the realism of your levels, though, and is well worth the effort it takes to implement.
| Note: An outstanding example of good lighting in Doom is in 99 Ways to Die by Warren Marshall. The authors suggest you get your hands on this fine WAD and check it out. |
Some of the Things in the game are expressly designed to serve as light sources. Unlike flats, Things are point-sources of light. Point-sources of light produce light that is bright nearby but grows rapidly dimmer the further away you move. In real life, point-sources of light tend to cast stark, dark shadows. Since Doom does not have the capability of effectively duplicating the effects of point-source lighting, using Things for light sources will not be quite as realistic as using other methods. You can improve the realism of Thing light sources through careful creation of sectors around the light source with light levels that gradually increase as the player approaches the Thing, and other sectors that simulate shadows.
Certain textures are also designed to be used as light sources. Very common uses of texture light sources are on either side of doors, but don't feel pressured to follow that convention. As with other light sources, to be use them realistically you must keep in mind where the light they give off will fall and what shadows they will create.
In addition to the considerations of general lighting in your levels, there are also several different types of lighting effects that are built into the Doom engine. Flickering, oscillating, and glowing lighting effects are possible in Doom, and can provide great boosts to the atmosphere of a level. Lighting effects can add a whole new visual dimension to your level, but, just as having room after room at the same lighting level is boring, so to will be room after room of pulsating lights. What's more, the lighting effects are a serious drain on the Doom engine. Blinking lights can be used as a substitute for near or total darkness to great effect. An example would be the computer maze room in E1M2 of the original Doom. Just as darkness can be used to generate tension, blinking lights can be just as effective. Lighting effects should definitely be used, but for a reason within your level and in moderation.
Just as you establish a visual theme within your level through consistent texture choice, you can also create additional visual continuity through the use of lighting effects. For example, if your level uses teleporters, try reserving the glowing light effect for teleporters exclusively. In addition to providing visual consistency, this will also give your players a visual point of reference that they will quickly associate with teleporters.
Monsters
Monsters are what ultimately give your level purpose. No matter how beautiful your level may look, if it doesn't contain a decent collection of bad guys to battle it will fall flat.
The key is to balance the monster mix in your level, make it consistent with the theme, and make it tough to beat. One excellent rule of thumb is to make your levels so that they are just barely survivable by you when you begin with just the pistol on the "hurt me plenty" skill level. As the level designer, you above all others should be able to beat it. If you find that you can just barely beat the level on the middle-of-the-road skill setting, and you have paid attention to setting the skill levels of the monsters and power-ups, it's a good indication that the level is tough enough without being too tough. Levels that find a magic difficulty level are those that will be played again and again, since the player never knows if they will survive any given attempt. Players like to be challenged, but lose interest quickly if they feel a level is unbeatable. If you can't survive your own level from a pistol start, it is very unlikely that anyone else will be able to.
Bill McClendon conducted an informal survey some time ago regarding the use of monsters. One of the major gripes that players had was that too many WAD authors felt the need to throw a Cyberdemon or three into their levels at every opportunity. Very few people enjoy fighting a big boss in every level they play. Just six strategically placed imps can inflict an incredible amount of damage on a player. Many level authors don't seem to appreciate how deadly a group of six or eight shotgun sergeants can be, especially since you have zero opportunity to dodge their fire.
Some textures provide natural camouflage for some of the monsters. The vine textures make imps very difficult to see. Spectres, being almost invisible to start with, all but disappear in front of some of the very complicated textures such as SP_ROCK1. Be sure to take this camouflage effect into account. If you are using a texture against which your monsters are difficult to see, you probably don't need to use as many monsters to get the effect you're looking for.
Other Things (Weapons, Health, Ammo, Armor, Power-ups)
These items are the other half, in conjunction with the monsters, of the equation that determines the difficulty of your level. Sure, you've got a level with Barons of Hell running all over the place, but if there's a cumulative total of 4000% health in the level, with rocket launchers and rockets all over the place, how tough will it really be?
One very challenging and entertaining WAD starts with a SoulSphere and the blue armor right where you start, but contains no additional armor or health anywhere else in the level. That level is a race against attrition to get to the exit. Resist the temptation to put down stimpacks and medical kits all over the place and we suggest that it would be a very rare — and extraordinarily tough — level that should have more than one SoulSphere or MegaSphere available.
The same thing goes for ammo and armor; less is definitely more. There should be enough ammo in the level to take out the bad guys you've put in, but not much more than that. Lack of ammo will force your players to become skilled shots, rather than just walking around your level holding the <ctrl> key down. Armor should be doled out carefully and even a bit grudgingly
Many good level authors dislike putting the blue armor or either of the health spheres in a level at all. Others like to make those items rewards for surviving particularly tough battles or figuring out puzzles. The approach taken is largely a matter of preference, so long as that magic difficulty mix is achieved.
Just as it's generally good to avoid putting a big boss on every level you make, it's also unnecessary and a bad idea to put the big guns on every level. In the original Doom, finding a plasma rifle or, especially, a BFG, was a major coup. Making that hard-won discovery was exciting all by itself. Far too many level authors give in to the impulse to make the big guns commonplace in their levels. If you just can't resist putting the big guns in your level, at least make them difficult to find and keep the ammo available for them to a minimum.
Don't forget that the players will obtain weapons and ammo from some of the monsters. A dead soldier will provide the player with bullets, a shotgun sergeant gives a shotgun and shells, and a chaingunner will cough up a chaingun and bullets. It's almost redundant to place those monsters and additional weapons (and, possibly, even ammo) of those types in your level.
Traps, Puzzles, and Secrets
In addition to the monsters, you may also require your players to fight the environment of the level itself. Lava and slime give you an excuse to cause damage to the player if they go wading. You can make the wading experience more likely or even inevitable if you choose. Lowering ceilings can be a real headache to your players, if you arrange them to be. Doom players expect to find those kinds of environmental obstacles in levels, and you should not ignore them.
Traps can be merely hazardous parts of the terrain that the player must navigate, or they can be more intricate. Many Doom levels have bobby-traps, for example, that release a squad of monsters on the unsuspecting player when they throw an innocent-looking switch. Some traps are baited with a big gun or powerup, and are activated when the player walks up to the item to grab it. Almost any kind of trap is considered fair, so long as it is beatable.
Puzzles are similar to the more intricate traps, but don't offer a direct threat to the player and usually provide a reward when the puzzle is figured out. As a simple example, you might have one switch temporarily expose another switch, perhaps out of direct view of the first switch but within running distance. The player, in that case, must recognize the sound of a wall lowering or a door opening and locate the second switch before it is hidden again. Finding the second switch in time might grant the player access to a weapon or powerup. Most Doom players don't enjoy a lot of puzzle solving, but, in moderation, puzzles can add a great deal to the enjoyment of your level. Be cautious, though, about making your puzzles too difficult. What seems obvious to you while writing the level will likely be very obscure to your players. As a rule of thumb, the puzzles you design will be five times more difficult than you think they will be.
Secrets are essentially hidden puzzles, usually very simple ones. In very nearly all of the id Software levels for Doom and Doom 2, there are hidden doors behind which are weapons, ammo, armor, or powerups. A few secret doors in the Doom games conceal hidden passages that offer the player shortcuts to other parts of the level. The existence of a secret is almost always indicated in some subtle way, such as a texture that is slightly out of place or a flashing light. Even more subtle clues may be given. For example, in Map29 (written by Ron Allen) of the STRAIN Total Conversion for Doom 2, there is a place where a lighting fixture takes the form of an arrow. The arrow-shaped lighting fixture is unique within the level, and points at a concealed area that contains a SoulSphere and some ammo. Part of the fun, for both players and level authors, is in the clues that give secrets away, so be creative. Secrets are very popular and considered almost a requirement by Doom players. You should definitely consider including a few in each level you design. One caution: don't put required items in secrets. If the player can't find the secret, they can't find the required item, which isn't what you want.
Common Errors
While creating Doom levels it is inevitable that you will make errors. Most Doom editing errors are described below, along with what causes each error and how to correct it.
Hall of Mirrors
Hall of Mirrors, or HOM, error is probably the second most common error found in Doom levels. HOM is caused by missing textures, and appears in the game as an oscillating section of wall. HOM does look a little like a wildly shaking mirror, with the image of surrounding textures repeating in endless series, and the name is in reference to the hall of mirrors funhouse attraction. The only way to correct HOM error is to apply a texture to the sidedef in question.
The Medusa Effect
The Medusa Effect gets its name because it looks like snakes and turns your computer to stone. Well, kind of anyway. This error is characterized by one or more sidedefs that look like many tubes or rods of different colors. While this multi-colored mess is on the screen, your computer slows way down.
The Medusa Effect is caused by the application of a multi-patch texture on the Normal of a two-sided linedef. The Doom engine is not able to correctly process the texture data for display under those conditions. To get rid of Medusa Effect, replace the multi-patch texture with a single patch texture.
Tutti-frutti, aka Confetti, aka Pink Bug
Tutti-frutti error looks like colored lines or dots, often a shade of pink, on some of your walls. Many level authors have either not recognized this as an error or didn't understand what caused it and how to correct it. As a result, many WADs available on the Internet contain this error.
Tutti-frutti is caused by one of two conditions:
- You have applied a texture that is less than 128 pixels tall to a sidedef that is taller than the texture. Doom tiles textures vertically on 128-pixel boundaries. When you apply a texture as described, there is a gap between where the texture ends and the next place where tiling begins. Since there is no texture data to display in that gap, Doom fills it in with pseudo-random garbage, known to level authors as Tutti-frutti.
- You have applied a texture that contains transparent areas, such as MIDGRATE, on the Normal of a one-sided linedef or on the Upper or Lower of either a one-sided or two-sided linedef. Under those conditions, Doom has no texture data to display in the transparent areas, and again fills the gaps with Tutti-frutti.
The most common place for Tutti-frutti is on the risers of stairs.
Long Wall Error
This error causes bullets to hit invisible walls (that you didn't put there), or walls to "jump" or "slide around". The cause of this error is, as the name implies, having walls that are too long for the Doom engine to handle. Fortunately, it takes a really huge wall to cause this error — on the order of several thousand units. Keep all individual linedefs to a length of 1024 or less and you should never encounter this error.
Visplane Error
Visplane is a "fatal" error; it causes Doom to crash during play. Until very recently, it has been unclear exactly what causes this error. It has always been assumed that Visplane Error happened when one or more Doom engine limits were exceeded. Since the Doom source code has been released, a much greater understanding of Visplane Error, and many other Doom limits and idiosyncrasies, has been reached.
Lee Killough, the custodian and current programmer of the BSP node builder, has already successfully removed all visplane limits from the Doom source code. Unfortunately, both you and your players must obtain a modified Doom executable to take advantage of that improvement. It will take time for the modified Doom executables being developed by Lee and others to be released and gain a significant player base. Until the majority of Doom players are running appropriately modified versions of Doom, it is suggested that you write levels for the lowest common denominator, i.e. the officially released Doom game.
The latest release of the BSP node builder does have the capability of reducing the frequency of Visplane errors in any WAD, including those being run on the officially released Doom games.
Visplane errors most commonly happen in large, complex, well-lighted areas. As the player moves through the area, Doom will suddenly crash with an error message like "R_Drawplanes: visplane overflow (xxx)" where xxx is a number over 128. The exact cause of the error can be different under different circumstances, so all that can be offered as a solution are some suggestions:
- Try blocking the players' line of sight to reduce the number of two-sided linedefs or changes in light level that are visible at the point the visplane crash happens.
- Redesign the room to use fewer two-sided linedefs and/or lighting changes.
For a much more detailed explanation of Visplane Error, what causes it, and how to avoid it, see Lee Killough's Visplane Information Page.
Moiré, aka Flash of Black Error
You should never see Moiré Error because the Doom engine was changed to avoid it in versions 1.4 and later. Since id Software has made upgrades to the Doom games freely available, no one should be running anything except the latest version (1.9 for both Doom and Doom 2). It is included here for completeness.
This error causes the screen to flash, in whole or in part. Usually the flashing appears to be random, but sometimes there's a pattern. Moiré is caused by very tall (over 599 units) walls, and gets worse as the wall gets taller. When a player walks up to a very tall wall, early versions of Doom had trouble displaying floor and ceiling flats properly, causing the error. To get rid of this error, upgrade to the latest version of Doom (preferred) or remove the very tall wall.
Linedefs or Vertices that Cross or Coincide
If two or more vertices occupy the same position, or if two or more linedefs intersect without a vertex at the intersection, Doom will crash trying to work out the sector math. Do not place vertices on top of each other, and do not cross linedefs without splitting them and placing a vertex at the intersection.
Wall Pegging
Wall faces exposed by rising or lowering sectors must have the Lower unpegged or the texture will seem to "roll up and down" with the moving sector. This is another very common error made by novice level authors.
Monster/Two-Sided Linedef Glut
These problems won't cause Doom to crash, but they may make your level nearly unplayable — especially to those who aren't playing on a fast machine.
Doom is capable of displaying only 64 Things at a time. When more than 64 Things are visible, Doom will compensate by displaying only 64 of them. This causes monsters and other Things to flicker on and off and other strange effects can occur. In addition to these problems, the game will become sluggish as Doom tries to keep up with the many calculations it must make to handle all the Things.
A large number of two-sided linedefs in a given room or area also has a slowing effect. Two-sided linedefs require much more calculation by the Doom engine. As Doom is forced to make more and more calculations during each processing cycle, the game can become slow or "jerky". This is distracting at best. On slower machines, the game can become too slow to play.
A proper reject table can alleviate some of the potential slowdowns due to monsters (although it won't break the 64 Thing limit). Nothing short of removal will help the situation if you have too many two-sided linedefs causing a slowdown.
Monsters Too Close to Walls/Other Monsters/Things
If monsters are started too close to walls, other monsters, or Things, they will be unable to move. The monster so placed will simply run in place at the point where they spawned. This looks very silly.
The minimum distance a monster must be from an adjacent wall is one-half the radius of the monster plus one. The minimum distance the monsters must be from each other is one-half the radius of the monster plus one plus one half of the radius of the other monster plus one. The distance for other Things is calculated the same as for other monsters.
Missing Player Starts
Doom will crash if you attempt to start a level that does not contain the appropriate player start Things. Every level must have, at minimum, a player one start Thing. If a level is to be released to the public, then player 2 -3 start Things and at least 4 deathmatch start Things should also be present.
Floor/Ceiling Mismatch
The minimum height the player must have in order to be able to move is 56 units. You must make certain that all areas of your level that you wish the player to move through have ceilings that are at least 56 units above the floor. Stairs are common problem areas in this regard. Playtesting your level, or having beta testers, should catch this version of the error.
A more subtle, and sometimes more difficult to catch, variety of this error is caused by having moving floors or ceilings. Unless you specify a crushing type (causes damage to the player), it is possible for the player to simply get trapped between moving floors/ceilings. This is unrealistic when the player gets trapped briefly, say as under a ceiling that lowers and then raises. It becomes a different kind of problem if the moving floor/ceiling never retracts, leaving the player permanently stuck. Another issue to consider is the possibility of trapping your players in a portion of your level by blocking the exit path with a moving floor or ceiling that didn't quite move far enough out of the way. Be careful when including moving floors or ceilings in your level.
Unbeatable Traps
Technically, this isn't an error but more an issue of style.
Many levels, including a few of the levels by id Software, have places where the player can become trapped with no way of escape. One example is in Map06 of Doom 2. There is a room in that level found after you pass the blue door, with a circular staircase, almost a ramp, where you are able to fall off either side. Falling off on the outside just sets your progress back a bit, but falling off on the inside traps you within the walls of the staircase. If you do fall off into the middle of the staircase, there is nothing you can do but either restart the game or use the rocket launcher to blow yourself up and restart the level.
Although such unbeatable traps are considered fair because they do exist in official id Software levels, most players really hate them. It's probably best if you avoid putting such traps in your level if possible.
Required Items in Secrets
Another style-related issue. Many level authors have chosen to put required items in hidden secret areas. Required items are most often keys, needed to be able to reach another section of the level, but could also be weapons. If you've populated your level with some of the tougher monsters, your players will need a bigger gun than the pistol to battle them effectively. Placing anything that the player must have to complete the level in a secret area is not considered fair by most players. If the player can not find the secret, they will simply be out of luck. This is extremely frustrating to players, and should be avoided.
Dead-End Levels
Most players seek the exit as the ultimate goal of the level. Not finding the exit, especially after all the monsters have been put out of action, is very frustrating. You should include an exit in every single level.
Texture Misalignment
This is the single most common error made by level authors. Although it has been mentioned several times in this document, properly aligned textures are an absolute must. Enough said.
Appendix B: Thing Dimensions
It is often required that you know the dimensions of the monsters and other Things so that you may design your levels appropriately. Monsters will not move down hallways that are less wide than twice their radius plus 1. Monsters will not travel up or down stairs that are less deep than 1˝ their radius. Monsters must have a ceiling clearance of at least their height at all times to move at all.
Note that heights given are used only when determining the required ceiling clearance. For purposes of game play, all Things are infinitely tall. A player on a ledge, for example, will be unable to jump off if his or her path is blocked by a row of Things (including health, armor, etc.) below the ledge. This also leads to an issue of style; you should be careful to not introduce unrealistic effects into your levels through Thing placement.
Doom 2 includes all Things found in Doom. In addition, Doom 2 contains several additional monsters. Those monsters found only in Doom 2 are indicated.
|
Thing |
Height |
Radius |
Doom/Doom 2 |
|
Player |
56 |
16 |
Both |
|
Soldier |
56 |
20 |
Both |
|
Shotgun Sergeant |
56 |
20 |
Both |
|
Chaingun Sergeant |
56 |
20 |
Doom 2 |
|
Imp |
56 |
20 |
Both |
|
Demon |
56 |
30 |
Both |
|
Specter |
56 |
30 |
Both |
|
Lost Soul |
56 |
16 |
Both |
|
Cacodemon |
56 |
31 |
Both |
|
Hell Knight |
64 |
24 |
Doom 2 |
|
Baron of Hell |
64 |
24 |
Both |
|
Arachnotron |
64 |
64 |
Doom 2 |
|
Pain Elemental |
56 |
31 |
Doom 2 |
|
Revenant |
56 |
20 |
Doom 2 |
|
Mancubus |
64 |
48 |
Doom 2 |
|
Arch Vile |
56 |
20 |
Doom 2 |
|
Spider MasterMind |
100 |
128 |
Both |
|
CyberDemon |
110 |
40 |
Both |
|
Wolfenstein SS |
56 |
20 |
Doom 2 |
|
Commander Keen |
72 |
16 |
Doom 2 |
|
Romero's Head |
16 |
16 |
Doom 2 |
|
Barrel |
16 |
20 |
Both |
|
Most "gettable" Things |
16 |
20 |
Both |
|
Most other Things |
16 |
16 |
Both |
|
Large Tree |
16 |
32 |
Both |
End of section
Appendix C: Action Linedef Types
This is a complete listing of all linedef types that you can use in Doom and Doom 2.
The action linedef type is assigned by the level author to the linedef that is desired to be the activation point of the given action. The linedef is then tagged to one or more sectors, which is where the action will occur.
Doom 2 contains all action linedef types from Doom, plus many more that are available only in Doom 2. The action types available only in Doom 2 are noted as such.
The "Activation" column shows the method as well as the repeatability of the actions through a two-letter code. The first character indicates the activation method.
|
Character |
Type |
Description |
|
D |
Door |
Used only on doors |
|
S |
Switch |
Player activates by "using" the linedef in the game |
|
W |
Walkover |
Player causes action by walking over the linedef |
|
G |
Gunfire |
Action is caused by the linedef being shot |
The second character is either a "1", for one-time activation, or "R", for "repeatable".
Be sure to read the additional notes on action linedef usage at the end of this section.
|
Type |
# |
Activation |
Description |
Game |
|
(none) |
0 |
-- |
Normal |
Both |
|
Doors |
1 |
DR |
Open door, closes after 4 seconds |
Both |
|
Doors |
63 |
SR |
Open door, closes after 4 seconds |
Both |
|
Doors |
29 |
S1 |
Open door, closes after 4 seconds |
Both |
|
Doors |
90 |
WR |
Open door, closes after 4 seconds |
Both |
|
Doors |
4 |
W1 |
Open door, closes after 4 seconds |
Both |
|
Doors |
31 |
DR |
Open door |
Both |
|
Doors |
61 |
SR |
Open door |
Both |
|
Doors |
103 |
S1 |
Open door |
Both |
|
Doors |
86 |
WR |
Open door |
Both |
|
Doors |
2 |
W1 |
Open door |
Both |
|
Doors |
46 |
G1 |
Open door |
Both |
|
Doors |
42 |
SR |
Close door |
Both |
|
Doors |
50 |
S1 |
Close door |
Both |
|
Doors |
75 |
WR |
Close door |
Both |
|
Doors |
3 |
W1 |
Close door |
Both |
|
Doors |
76 |
WR |
Close door for 30 seconds |
Both |
|
Doors |
16 |
W1 |
Close door for 30 seconds |
Both |
|
Doors |
117 |
DR |
Turbo open door, closes after 4 seconds |
Doom 2 |
|
Doors |
114 |
SR |
Turbo open door, closes after 4 seconds |
Doom 2 |
|
Doors |
111 |
S1 |
Turbo open door, closes after 4 seconds |
Doom 2 |
|
Doors |
105 |
WR |
Turbo open door, closes after 4 seconds |
Doom 2 |
|
Doors |
108 |
W1 |
Turbo open door, closes after 4 seconds |
Doom 2 |
|
Doors |
118 |
DR |
Turbo open door |
Doom 2 |
|
Doors |
115 |
SR |
Turbo open door |
Doom 2 |
|
Doors |
112 |
S1 |
Turbo open door |
Doom 2 |
|
Doors |
106 |
WR |
Turbo open door |
Doom 2 |
|
Doors |
109 |
W1 |
Turbo open door |
Doom 2 |
|
Doors |
113 |
SR |
Turbo close door |
Doom 2 |
|
Doors |
116 |
S1 |
Turbo close door |
Doom 2 |
|
Doors |
107 |
WR |
Turbo close door |
Doom 2 |
|
Doors |
110 |
W1 |
Turbo close door |
Doom 2 |
|
Doors |
26 |
DR |
Open BLUE door, closes after 4 seconds |
Both |
|
Doors |
27 |
DR |
Open YELLOW door, closes after 4 seconds |
Both |
|
Doors |
28 |
DR |
Open RED door, closes after 4 seconds |
Both |
|
Doors |
32 |
DR |
Open BLUE door |
Both |
|
Doors |
34 |
DR |
Open YELLOW door |
Both |
|
Doors |
33 |
DR |
Open RED door |
Both |
|
Doors |
99 |
SR |
Turbo open BLUE door |
Doom 2 |
|
Doors |
133 |
S1 |
Turbo open BLUE door |
Doom 2 |
|
Doors |
136 |
SR |
Turbo open YELLOW door |
Doom 2 |
|
Doors |
137 |
S1 |
Turbo open YELLOW door |
Doom 2 |
|
Doors |
134 |
SR |
Turbo open RED door |
Doom 2 |
|
Doors |
135 |
S1 |
Turbo open RED door |
Doom 2 |
|
Ceilings |
43 |
SR |
Lower ceiling to floor |
Both |
|
Ceilings |
41 |
S1 |
Lower ceiling to floor |
Both |
|
Ceilings |
72 |
WR |
Lower ceiling to floor +8 (crush) |
Both |
|
Ceilings |
44 |
W1 |
Lower ceiling to floor +8 (crush) |
Both |
|
Ceilings |
40 |
W1 |
Raise ceiling to highest ceiling |
Both |
|
Ceilings |
25 |
W1 |
Start slow crushing ceiling |
Doom 2 |
|
Ceilings |
49 |
S1 |
Lower ceiling to floor +8 (crush) |
Doom 2 |
|
Ceilings |
85 |
WR |
Lower floor and raise ceiling |
Doom 2 |
|
Ceilings |
141 |
W1 |
Start silent crushing ceiling |
Doom 2 |
|
Raise Floors |
69 |
SR |
Raise floor to nearest floor |
Both |
|
Raise Floors |
18 |
S1 |
Raise floor to nearest floor |
Both |
|
Raise Floors |
128 |
WR |
Raise floor to nearest floor |
Doom 2 |
|
Raise Floors |
119 |
W1 |
Raise floor to nearest floor |
Doom 2 |
|
Raise Floors |
132 |
SR |
Turbo raise floor to nearest floor |
Doom 2 |
|
Raise Floors |
131 |
S1 |
Turbo raise floor to nearest floor |
Doom 2 |
|
Raise Floors |
129 |
WR |
Turbo raise floor to nearest floor |
Doom 2 |
|
Raise Floors |
130 |
W1 |
Turbo raise floor to nearest floor |
Doom 2 |
|
Raise Floors |
68 |
SR |
Raise floor to nearest floor & change texture |
Both |
|
Raise Floors |
20 |
S1 |
Raise floor to nearest floor & change texture |
Both |
|
Raise Floors |
95 |
WR |
Raise floor to nearest floor & change texture |
Both |
|
Raise Floors |
22 |
W1 |
Raise floor to nearest floor & change texture |
Both |
|
Raise Floors |
47 |
G1 |
Raise floor to nearest floor & change texture |
Both |
|
Raise Floors |
64 |
SR |
Raise floor to nearest ceiling |
Both |
|
Raise Floors |
101 |
S1 |
Raise floor to nearest ceiling |
Both |
|
Raise Floors |
91 |
WR |
Raise floor to nearest ceiling |
Both |
|
Raise Floors |
5 |
W1 |
Raise floor to nearest ceiling |
Both |
|
Raise Floors |
24 |
G1 |
Raise floor to nearest ceiling |
Both |
|
Raise Floors |
65 |
SR |
Raise floor to nearest ceiling -8 (crush) |
Both |
|
Raise Floors |
55 |
S1 |
Raise floor to nearest ceiling -8 (crush) |
Both |
|
Raise Floors |
94 |
WR |
Raise floor to nearest ceiling -8 (crush) |
Both |
|
Raise Floors |
56 |
W1 |
Raise floor to nearest ceiling -8 (crush) |
Both |
|
Raise Floors |
67 |
SR |
Raise floor 32, change texture |
Both |
|
Raise Floors |
14 |
S1 |
Raise floor 32, change texture |
Both |
|
Raise Floors |
66 |
SR |
Raise floor 24. change texture |
Both |
|
Raise Floors |
15 |
S1 |
Raise floor 24, change texture |
Both |
|
Raise Floors |
93 |
WR |
Raise floor 24, change texture and type |
Both |
|
Raise Floors |
59 |
W1 |
Raise floor 24, change texture and type |
Both |
|
Raise Floors |
92 |
WR |
Raise floor 24 |
Both |
|
Raise Floors |
58 |
W1 |
Raise floor 24 |
Both |
|
Raise Floors |
96 |
WR |
Raise floor (double shortest height) |
Both |
|
Raise Floors |
30 |
W1 |
Raise floor (double shortest height) |
Both |
|
Raise Floors |
140 |
S1 |
Raise floor by 512 |
Doom 2 |
|
Lower Floors |
45 |
SR |
Lower floor to nearest floor |
Both |
|
Lower Floors |
102 |
S1 |
Lower floor to nearest floor |
Both |
|
Lower Floors |
83 |
WR |
Lower floor to nearest floor |
Both |
|
Lower Floors |
19 |
W1 |
Lower floor to nearest floor |
Both |
|
Lower Floors |
70 |
SR |
Turbo lower to nearest +8 |
Both |
|
Lower Floors |
71 |
S1 |
Turbo lower to nearest +8 |
Both |
|
Lower Floors |
98 |
WR |
Turbo lower to nearest +8 |
Both |
|
Lower Floors |
36 |
W1 |
Turbo lower to nearest +8 |
Both |
|
Lower Floors |
60 |
SR |
Lower floor to lowest floor |
Both |
|
Lower Floors |
23 |
S1 |
Lower floor to lowest floor |
Both |
|
Lower Floors |
82 |
WR |
Lower floor to lowest floor |
Both |
|
Lower Floors |
38 |
W1 |
Lower floor to lowest floor |
Both |
|
Lower Floors |
84 |
WR |
Lower floor to nearest, change texture & type |
Both |
|
Lower Floors |
37 |
W1 |
Lower floor to nearest, change texture & type |
Both |
|
Lower Floors |
9 |
S1 |
Lower pillar, raise and change donut |
Both |
|
Moving Things |
62 |
SR |
Lower lift for 3 seconds |
Both |
|
Moving Things |
21 |
S1 |
Lower lift for 3 seconds |
Both |
|
Moving Things |
88 |
WR |
Lower lift for 3 seconds |
Both |
|
Moving Things |
10 |
W1 |
Lower lift for 3 seconds |
Both |
|
Moving Things |
123 |
SR |
Turbo lower lift for 3 seconds |
Doom 2 |
|
Moving Things |
122 |
S1 |
Turbo lower lift for 3 seconds |
Doom 2 |
|
Moving Things |
120 |
WR |
Turbo lower lift for 3 seconds |
Doom 2 |
|
Moving Things |
121 |
W1 |
Turbo lower lift for 3 seconds |
Doom 2 |
|
Moving Things |
73 |
WR |
Start crushing ceiling |
Both |
|
Moving Things |
77 |
WR |
Start fast crushing ceiling |
Both |
|
Moving Things |
6 |
W1 |
Start fast crushing ceiling |
Both |
|
Moving Things |
74 |
WR |
Stop crushing ceiling |
Both |
|
Moving Things |
57 |
W1 |
Stop crushing ceiling |
Both |
|
Moving Things |
87 |
WR |
Start up and down floor movement |
Both |
|
Moving Things |
53 |
W1 |
Start up and down floor movement |
Both |
|
Moving Things |
89 |
WR |
Stop up and down floor movement |
Both |
|
Moving Things |
54 |
W1 |
Stop up and down floor movement |
Both |
|
Moving Things |
7 |
S1 |
Raise stairs +8 |
Both |
|
Moving Things |
8 |
W1 |
Raise stairs +8 |
Both |
|
Moving Things |
127 |
S1 |
Turbo raise stairs (+16) |
Doom 2 |
|
Moving Things |
100 |
W1 |
Turbo raise stairs (+16) |
Doom 2 |
|
Special |
11 |
S- |
End level |
Both |
|
Special |
52 |
W- |
End level |
Both |
|
Special |
51 |
S- |
Exit to Secret level |
Both |
|
Special |
124 |
W- |
Exit to Secret level |
Doom 2 |
|
Special |
97 |
WR |
Teleport to sector |
Both |
|
Special |
39 |
W1 |
Teleport to sector |
Both |
|
Special |
126 |
WR |
Teleport monster to sector |
Doom 2 |
|
Special |
125 |
W1 |
Teleport monster to sector |
Doom 2 |
|
Special |
81 |
WR |
Change lights to 255 |
Both |
|
Special |
13 |
W1 |
Change lights to 255 |
Both |
|
Special |
79 |
WR |
Change lights to 0 |
Both |
|
Special |
35 |
W1 |
Change lights to 0 |
Both |
|
Special |
139 |
SR |
Change lights to max nearby |
Doom 2 |
|
Special |
80 |
WR |
Change lights to max nearby |
Both |
|
Special |
12 |
W1 |
Change lights to max nearby |
Both |
|
Special |
138 |
SR |
Change lights to min nearby |
Doom 2 |
|
Special |
78 |
WR |
Change lights to min nearby lights |
Doom 2 |
|
Special |
104 |
W1 |
Change lights to min nearby |
Both |
|
Special |
17 |
W1 |
Start blinking lights (1 second blinks) |
Both |
|
Special |
48 |
-- |
Texture scrolls horizontally |
Both |
Some Notes on Action Linedef Usage
- The "door" linedef types are special in that they do not need to be tagged to a sector to function, presuming that you follow certain Doom editing conventions when creating doors. If you create the sector that is a door in your level with the first sidedefs of the door faces pointing outward, rather than inward, you may assign a door linedef type to the door face linedefs and omit the tag to the sector of the door. When using the door linedef types, Doom assumes that the sector that the second sidedef of the linedef the action type is part of is the sector that action is to be taken on.
- There are several "raise floor" action linedef types that include a "change texture" or "change texture and type" qualifier. These actions will raise the floor of the action sector, while also changing the texture (flat) of that sector to the same as that of the surrounding area. If the linedef type also includes "change type", the action sector type will also change to that of the surrounding area. These linedef types can be used, for example, to raise the floor of a pit that has toxic slime in it and create the effect that the slime "drained off" when the floor was raised.
- Unless a linedef type is specified as "crushing", the player and monsters will take no damage if they are caught under them. If you want to damage the player if they get caught under the moving object, be sure to use one of the crushing linedef types.
- "Teleport to sector" linedef types will teleport both players and monsters. "Teleport monster to sector" linedef types will only teleport monsters. If you do not want monsters to follow the player through a teleporter, you must use the "monsters can not cross" flag to prevent monsters from entering the teleporter.
- The "teleport" linedefs are only activated when walked over while moving from the first side to the second. Your teleport pads must, therefore, have all first sidedefs pointing outward from the sector of the teleporter.
- The "exit to secret level" linedef type only works within levels that replace the same levels in the game that have exits to secret levels. This is because the option to exit to a secret level is hard-coded into the games themselves.
End of section
Appendix D: Doom Textures
|
Texture Name |
Width |
Height |
Patch |
|
aastinky |
24 |
72 |
M |
|
ashwall |
64 |
128 |
S |
|
bigdoor1 |
128 |
96 |
S |
|
bigdoor2 |
128 |
128 |
S |
|
bigdoor3 |
128 |
128 |
S |
|
bigdoor4 |
128 |
128 |
M |
|
bigdoor5 |
128 |
128 |
M |
|
bigdoor6 |
128 |
112 |
M |
|
bigdoor7 |
128 |
128 |
S |
|
blodgr1 |
32 |
128 |
S |
|
blodgr2 |
32 |
128 |
S |
|
blodgr3 |
32 |
128 |
S |
|
blodgr4 |
32 |
128 |
S |
|
blodrip1 |
32 |
128 |
S |
|
blodrip2 |
32 |
128 |
S |
|
blodrip3 |
32 |
128 |
S |
|
blodrip4 |
32 |
128 |
S |
|
brnbigc |
128 |
128 |
S |
|
brnbigl |
32 |
128 |
S |
|
brnbigr |
32 |
128 |
S |
|
brnpois |
64 |
128 |
S |
|
brnpois2 |
64 |
128 |
S |
|
brnsmal1 |
64 |
64 |
S |
|
brnsmal2 |
64 |
64 |
S |
|
brnsmalc |
64 |
64 |
S |
|
brnsmall |
32 |
64 |
S |
|
brnsmalr |
32 |
64 |
S |
|
brovine |
256 |
128 |
M |
|
brovine2 |
256 |
128 |
M |
|
brown1 |
128 |
128 |
M |
|
brown144 |
128 |
128 |
M |
|
brown96 |
128 |
128 |
S |
|
browngrn |
64 |
128 |
S |
|
brownhug |
64 |
128 |
M |
|
brownpip |
128 |
128 |
M |
|
brownwel |
256 |
72 |
M |
|
cement1 |
128 |
128 |
S |
|
cement2 |
128 |
128 |
S |
|
cement3 |
128 |
128 |
S |
|
cement4 |
128 |
128 |
S |
|
cement5 |
128 |
128 |
S |
|
cement6 |
128 |
128 |
S |
|
cempois |
128 |
128 |
M |
|
comp2 |
256 |
128 |
M |
|
compblue |
64 |
128 |
M |
|
compohso |
128 |
128 |
M |
|
compspan |
32 |
128 |
M |
|
compsta1 |
128 |
128 |
M |
|
compsta2 |
128 |
128 |
M |
|
comptall |
256 |
128 |
M |
|
comptile |
128 |
128 |
M |
|
compute1 |
128 |
128 |
M |
|
compute2 |
256 |
56 |
M |
|
compute3 |
128 |
128 |
M |
|
compwerd |
64 |
128 |
M |
|
crate1 |
64 |
128 |
M |
|
crate2 |
64 |
128 |
M |
|
cratelit |
64 |
128 |
M |
|
cratiny |
64 |
16 |
M |
|
cratwide |
128 |
128 |
M |
|
door1 |
64 |
72 |
S |
|
door3 |
64 |
72 |
S |
|
doorblu |
8 |
128 |
M |
|
doorblu2 |
16 |
128 |
M |
|
doorhi |
64 |
128 |
M |
|
doorred |
8 |
128 |
M |
|
doorred2 |
16 |
128 |
M |
|
doorstop |
8 |
128 |
S |
|
doortrak |
8 |
128 |
S |
|
dooryel |
8 |
128 |
M |
|
dooryel2 |
16 |
128 |
M |
|
exitdoor |
128 |
72 |
M |
|
exitsign |
64 |
16 |
M |
|
exitston |
64 |
128 |
M |
|
fireblu1 |
128 |
128 |
S |
|
fireblu2 |
128 |
128 |
S |
|
firelav2 |
128 |
128 |
S |
|
firelav3 |
128 |
128 |
S |
|
firelava |
128 |
128 |
S |
|
firemag1 |
128 |
128 |
S |
|
firemag2 |
128 |
128 |
S |
|
firemag3 |
128 |
128 |
S |
|
firewala |
128 |
112 |
S |
|
firewalb |
128 |
112 |
S |
|
firewall |
128 |
112 |
S |
|
gray1 |
64 |
128 |
M |
|
gray2 |
64 |
72 |
M |
|
gray4 |
64 |
128 |
M |
|
gray5 |
64 |
128 |
M |
|
gray7 |
256 |
128 |
M |
|
graybig |
128 |
128 |
M |
|
graydang |
64 |
128 |
M |
|
graypois |
64 |
72 |
M |
|
graytall |
128 |
128 |
M |
|
grayvine |
256 |
128 |
M |
|
gstfont1 |
64 |
128 |
S |
|
gstfont2 |
64 |
128 |
S |
|
gstfont3 |
64 |
128 |
S |
|
gstgarg |
64 |
128 |
S |
|
gstlion |
64 |
128 |
S |
|
gstone1 |
256 |
128 |
M |
|
gstone2 |
256 |
128 |
M |
|
gstsatyr |
64 |
128 |
S |
|
gstvine1 |
256 |
128 |
M |
|
gstvine2 |
256 |
128 |
M |
|
ickdoor1 |
64 |
72 |
M |
|
ickdwall1 |
64 |
128 |
M |
|
ickwall2 |
64 |
128 |
M |
|
ickwall3 |
64 |
128 |
M |
|
ickwall4 |
64 |
128 |
M |
|
ickwall5 |
64 |
128 |
M |
|
ickwall6 |
64 |
128 |
M |
|
ickwall7 |
64 |
128 |
M |
|
lite2 |
64 |
128 |
M |
|
lite3 |
32 |
128 |
M |
|
lite4 |
16 |
128 |
M |
|
lite5 |
16 |
128 |
M |
|
lite96 |
64 |
128 |
M |
|
liteblu1 |
8 |
128 |
S |
|
liteblu2 |
16 |
72 |
S |
|
liteblu3 |
16 |
128 |
M |
|
liteblu4 |
16 |
128 |
M |
|
litemet |
128 |
128 |
M |
|
litered |
16 |
128 |
M |
|
liteston |
64 |
128 |
M |
|
marbfac2 |
128 |
128 |
S |
|
marbfac3 |
128 |
128 |
S |
|
marbface |
128 |
128 |
S |
|
marble1 |
128 |
128 |
S |
|
marble2 |
128 |
128 |
S |
|
marble3 |
128 |
128 |
S |
|
marblod1 |
128 |
128 |
S |
|
metal |
64 |
128 |
S |
|
metal1 |
64 |
128 |
M |
|
midbrn1 |
64 |
112 |
S |
|
midgrate |
128 |
128 |
S |
|
midvine1 |
256 |
128 |
S |
|
midvine2 |
256 |
128 |
S |
|
nuke24 |
64 |
24 |
S |
|
nukedge1 |
128 |
128 |
M |
|
nukepois |
64 |
128 |
M |
|
nukeslad |
64 |
128 |
S |
|
pipe1 |
256 |
128 |
S |
|
pipe2 |
256 |
128 |
S |
|
pipe4 |
256 |
128 |
S |
|
pipe6 |
256 |
128 |
S |
|
planet1 |
256 |
128 |
M |
|
plat1 |
128 |
128 |
S |
|
redwall |
128 |
128 |
S |
|
redwall1 |
128 |
128 |
M |
|
rockred1 |
128 |
128 |
S |
|
rockred2 |
128 |
128 |
S |
|
rockred3 |
128 |
128 |
S |
|
shawn1 |
128 |
128 |
M |
|
shawn2 |
64 |
128 |
S |
|
shawn3 |
64 |
72 |
S |
|
skin2 |
128 |
128 |
M |
|
skinbord |
64 |
128 |
M |
|
skincut |
256 |
128 |
M |
|
skinedge |
128 |
128 |
M |
|
skinface |
256 |
128 |
M |
|
skinlow |
256 |
104 |
M |
|
skinmet1 |
256 |
128 |
M |
|
skinmet2 |
256 |
128 |
M |
|
skinscab |
256 |
128 |
M |
|
skinsymb |
256 |
128 |
M |
|
skintek1 |
256 |
128 |
M |
|
skintek2 |
256 |
128 |
M |
|
sksnake1 |
64 |
128 |
S |
|
sksnake2 |
64 |
128 |
S |
|
skspine1 |
128 |
128 |
S |
|
skspine2 |
256 |
96 |
M |
|
skulwal3 |
128 |
128 |
M |
|
skulwall |
128 |
128 |
M |
|
sky1 |
256 |
128 |
S |
|
sky2 |
256 |
128 |
S |
|
sky3 |
256 |
128 |
S |
|
sky4 |
256 |
128 |
S |
|
sladpois |
64 |
128 |
M |
|
sladrip1 |
64 |
128 |
S |
|
sladrip2 |
64 |
128 |
S |
|
sladrip3 |
64 |
128 |
S |
|
sladskul |
64 |
128 |
M |
|
sladwall |
64 |
128 |
S |
|
sp_dude1 |
128 |
128 |
S |
|
sp_dude2 |
128 |
128 |
S |
|
sp_dude3 |
64 |
128 |
S |
|
sp_dude4 |
64 |
128 |
S |
|
sp_dude5 |
64 |
128 |
S |
|
sp_dude6 |
64 |
128 |
S |
|
sp_face1 |
128 |
96 |
S |
|
sp_hot1 |
256 |
128 |
M |
|
sp_rock1 |
128 |
128 |
S |
|
sp_rock2 |
128 |
128 |
S |
|
starbr2 |
128 |
128 |
M |
|
starg1 |
64 |
128 |
M |
|
starg2 |
128 |
128 |
M |
|
starg3 |
128 |
128 |
M |
|
stargr1 |
64 |
128 |
M |
|
stargr2 |
128 |
128 |
M |
|
startan1 |
64 |
128 |
M |
|
startan2 |
128 |
128 |
M |
|
startan3 |
128 |
128 |
M |
|
step1 |
32 |
8 |
S |
|
step2 |
32 |
8 |
S |
|
step3 |
32 |
8 |
S |
|
step4 |
32 |
16 |
M |
|
step5 |
32 |
16 |
M |
|
step6 |
32 |
16 |
M |
|
steplad1 |
64 |
16 |
S |
|
steptop |
128 |
16 |
S |
|
stone |
256 |
128 |
M |
|
stone2 |
128 |
128 |
M |
|
stone3 |
128 |
128 |
M |
|
stongarg |
128 |
128 |
M |
|
stonpois |
64 |
128 |
M |
|
support2 |
64 |
128 |
M |
|
support3 |
64 |
128 |
M |
|
sw1blue |
64 |
128 |
M |
|
sw1brcom |
128 |
128 |
M |
|
sw1brn1 |
64 |
128 |
M |
|
sw1brn2 |
64 |
128 |
M |
|
sw1brngn |
64 |
128 |
M |
|
sw1brown |
128 |
128 |
M |
|
sw1cmt |
64 |
128 |
M |
|
sw1comm |
64 |
72 |
M |
|
sw1comp |
64 |
128 |
M |
|
sw1dirt |
64 |
128 |
M |
|
sw1exit |
32 |
72 |
M |
|
sw1garg |
64 |
128 |
M |
|
sw1gray |
64 |
128 |
M |
|
sw1gray1 |
64 |
128 |
M |
|
sw1gston |
64 |
128 |
M |
|
sw1hot |
64 |
128 |
M |
|
sw1lion |
64 |
128 |
M |
|
sw1metal |
64 |
128 |
M |
|
sw1pipe |
128 |
128 |
M |
|
sw1satyr |
64 |
128 |
M |
|
sw1skin |
64 |
128 |
M |
|
sw1slad |
64 |
128 |
M |
|
sw1starg |
128 |
128 |
M |
|
sw1ston1 |
64 |
128 |
M |
|
sw1ston2 |
64 |
128 |
M |
|
sw1stone |
64 |
128 |
M |
|
sw1strtn |
64 |
128 |
M |
|
sw1vine |
64 |
128 |
M |
|
sw1wood |
64 |
128 |
M |
|
sw2blue |
64 |
128 |
M |
|
sw2brcom |
128 |
128 |
M |
|
sw2brn1 |
64 |
128 |
M |
|
sw2brn2 |
64 |
128 |
M |
|
sw2brngn |
64 |
128 |
M |
|
sw2brown |
128 |
128 |
M |
|
sw2cmt |
64 |
128 |
M |
|
sw2comm |
64 |
72 |
M |
|
sw2comp |
64 |
128 |
M |
|
sw2dirt |
64 |
128 |
M |
|
sw2exit |
32 |
72 |
M |
|
sw2garg |
64 |
128 |
M |
|
sw2gray |
64 |
128 |
M |
|
sw2gray1 |
64 |
128 |
M |
|
sw2gston |
64 |
128 |
M |
|
sw2hot |
64 |
128 |
M |
|
sw2lion |
64 |
128 |
M |
|
sw2metal |
64 |
128 |
M |
|
sw2pipe |
128 |
128 |
M |
|
sw2satyr |
64 |
128 |
M |
|
sw2skin |
64 |
128 |
M |
|
sw2slad |
64 |
128 |
M |
|
sw2starg |
128 |
128 |
M |
|
sw2ston1 |
64 |
128 |
M |
|
sw2ston2 |
64 |
128 |
M |
|
sw2stone |
64 |
128 |
M |
|
sw2strtn |
64 |
128 |
M |
|
sw2vine |
64 |
128 |
M |
|
sw2wood |
64 |
128 |
M |
|
tekwall1 |
128 |
128 |
M |
|
tekwall2 |
128 |
128 |
M |
|
tekwall3 |
128 |
112 |
S |
|
tekwall4 |
128 |
128 |
S |
|
tekwall5 |
128 |
128 |
M |
|
wood1 |
256 |
128 |
M |
End of section
Appendix E: Doom 2 Textures
|
Texture Name |
Width |
Height |
Patch |
|
aashitty |
64 |
64 |
S |
|
ashwall2 |
64 |
128 |
S |
|
ashwall3 |
64 |
128 |
S |
|
ashwall4 |
64 |
128 |
S |
|
ashwall6 |
64 |
128 |
S |
|
ashwall7 |
64 |
128 |
S |
|
bfall1 |
64 |
128 |
S |
|
bfall2 |
64 |
128 |
S |
|
bfall3 |
64 |
128 |
S |
|
bfall4 |
64 |
128 |
S |
|
bigbrik1 |
64 |
128 |
S |
|
bigbrik2 |
64 |
128 |
S |
|
bigbrik3 |
64 |
128 |
S |
|
bigdoor1 |
128 |
96 |
M |
|
bigdoor2 |
128 |
128 |
S |
|
bigdoor3 |
128 |
128 |
S |
|
bigdoor4 |
128 |
128 |
S |
|
bigdoor5 |
128 |
128 |
M |
|
bigdoor6 |
128 |
128 |
M |
|
bigdoor7 |
128 |
128 |
M |
|
blakwal1 |
64 |
128 |
S |
|
blakwal2 |
64 |
128 |
S |
|
blodrip1 |
32 |
128 |
S |
|
blodrip2 |
32 |
128 |
S |
|
blodrip3 |
32 |
128 |
S |
|
blodrip4 |
32 |
128 |
S |
|
brick1 |
64 |
128 |
S |
|
brick10 |
64 |
128 |
S |
|
brick11 |
64 |
128 |
S |
|
brick12 |
64 |
128 |
S |
|
brick2 |
64 |
128 |
S |
|
brick3 |
64 |
128 |
S |
|
brick4 |
64 |
128 |
S |
|
brick5 |
128 |
128 |
M |
|
brick6 |
64 |
128 |
S |
|
brick7 |
64 |
128 |
S |
|
brick8 |
64 |
128 |
S |
|
brick9 |
64 |
128 |
S |
|
bricklit |
64 |
128 |
S |
|
brnpois |
128 |
128 |
M |
|
brnsmal1 |
64 |
64 |
S |
|
brnsmal2 |
64 |
64 |
S |
|
brnsmalc |
64 |
64 |
S |
|
brnsmall |
32 |
64 |
S |
|
brnsmalr |
32 |
64 |
S |
|
bronze1 |
64 |
128 |
S |
|
bronze2 |
64 |
128 |
S |
|
bronze3 |
64 |
128 |
S |
|
bronze4 |
64 |
128 |
S |
|
brovine2 |
256 |
128 |
M |
|
brown1 |
128 |
128 |
M |
|
brown144 |
128 |
128 |
M |
|
brown96 |
128 |
128 |
S |
|
browngrn |
64 |
128 |
S |
|
brownhug |
64 |
128 |
M |
|
brownpip |
128 |
128 |
M |
|
brwindow |
64 |
128 |
S |
|
bstone1 |
64 |
128 |
S |
|
bstone2 |
64 |
128 |
S |
|
bstone3 |
64 |
128 |
S |
|
cement1 |
128 |
128 |
S |
|
cement2 |
128 |
128 |
S |
|
cement3 |
128 |
128 |
S |
|
cement4 |
128 |
128 |
S |
|
cement5 |
128 |
128 |
S |
|
cement6 |
128 |
128 |
S |
|
cement7 |
64 |
128 |
S |
|
cement8 |
64 |
128 |
S |
|
cement9 |
64 |
128 |
S |
|
compblue |
64 |
128 |
M |
|
compspan |
32 |
128 |
M |
|
compsta1 |
128 |
128 |
M |
|
compsta2 |
128 |
128 |
M |
|
comptall |
256 |
128 |
M |
|
compwerd |
64 |
128 |
M |
|
crackle2 |
64 |
128 |
S |
|
crackle4 |
64 |
128 |
S |
|
crate1 |
64 |
128 |
M |
|
crate2 |
64 |
128 |
M |
|
crate3 |
64 |
128 |
M |
|
cratelit |
64 |
128 |
M |
|
cratiny |
64 |
16 |
M |
|
cratwide |
128 |
128 |
M |
|
dbrain1 |
64 |
32 |
S |
|
dbrain2 |
64 |
32 |
S |
|
dbrain3 |
64 |
32 |
S |
|
dbrain4 |
64 |
32 |
S |
|
door1 |
64 |
72 |
S |
|
door3 |
64 |
72 |
S |
|
doorblu |
8 |
128 |
M |
|
doorblu2 |
16 |
128 |
M |
|
doorred |
8 |
128 |
M |
|
doorred2 |
16 |
128 |
M |
|
doorstop |
8 |
128 |
S |
|
doortrack |
8 |
128 |
S |
|
dooryel |
8 |
128 |
M |
|
dooryel2 |
16 |
128 |
M |
|
exitdoor |
128 |
72 |
M |
|
exitsign |
64 |
16 |
M |
|
exitston |
64 |
128 |
M |
|
fireblu1 |
128 |
128 |
S |
|
fireblu2 |
128 |
128 |
S |
|
firelav1 |
128 |
128 |
S |
|
firelav2 |
128 |
128 |
S |
|
firelav3 |
128 |
128 |
S |
|
firelava |
128 |
128 |
S |
|
firemag1 |
128 |
128 |
S |
|
firemag2 |
128 |
128 |
S |
|
firemag3 |
128 |
128 |
S |
|
firewala |
128 |
112 |
S |
|
firewalb |
128 |
112 |
S |
|
firewall |
128 |
112 |
S |
|
gray1 |
64 |
128 |
M |
|
gray2 |
64 |
72 |
M |
|
gray4 |
64 |
128 |
M |
|
gray5 |
64 |
128 |
M |
|
gray7 |
256 |
128 |
M |
|
graybig |
128 |
128 |
M |
|
graypois |
64 |
72 |
M |
|
graytall |
128 |
128 |
M |
|
grayvine |
256 |
128 |
M |
|
gstfont1 |
64 |
128 |
S |
|
gstfont2 |
64 |
128 |
S |
|
gstfont3 |
64 |
128 |
S |
|
gstgarg |
64 |
128 |
S |
|
gstlion |
64 |
128 |
S |
|
gstone1 |
256 |
128 |
M |
|
gstone2 |
256 |
128 |
M |
|
gstsatyr |
64 |
128 |
S |
|
gstvine1 |
256 |
128 |
M |
|
gstvine2 |
256 |
128 |
M |
|
ickwall1 |
64 |
128 |
M |
|
ickwall2 |
64 |
128 |
M |
|
ickwall3 |
64 |
128 |
M |
|
ickwall4 |
64 |
128 |
M |
|
ickwall5 |
64 |
128 |
M |
|
ickwall7 |
64 |
128 |
M |
|
lite3 |
32 |
128 |
M |
|
lite5 |
16 |
128 |
M |
|
liteblu1 |
8 |
128 |
S |
|
liteblu4 |
16 |
128 |
M |
|
marbfac2 |
128 |
128 |
S |
|
marbfac3 |
128 |
128 |
S |
|
marbfac4 |
64 |
128 |
S |
|
marbface |
128 |
128 |
S |
|
marbgray |
64 |
128 |
S |
|
marble1 |
128 |
128 |
S |
|
marble2 |
128 |
128 |
S |
|
marble3 |
128 |
128 |
S |
|
marblod1 |
128 |
128 |
S |
|
metal |
64 |
128 |
S |
|
metal1 |
64 |
128 |
M |
|
metal2 |
64 |
128 |
S |
|
metal3 |
64 |
128 |
S |
|
metal4 |
64 |
128 |
S |
|
metal5 |
64 |
128 |
S |
|
metal6 |
64 |
128 |
S |
|
metal7 |
64 |
128 |
S |
|
midbars1 |
64 |
128 |
S |
|
midbars3 |
64 |
72 |
S |
|
midbrn1 |
64 |
112 |
S |
|
midbronz |
64 |
128 |
S |
|
midgrate |
128 |
128 |
S |
|
midspace |
64 |
128 |
S |
|
modwall1 |
64 |
128 |
S |
|
modwall2 |
64 |
128 |
S |
|
modwall3 |
64 |
128 |
S |
|
modwall4 |
64 |
128 |
S |
|
nuke24 |
64 |
128 |
S |
|
nukedge1 |
128 |
128 |
M |
|
nukepois |
128 |
128 |
M |
|
panblack |
64 |
128 |
S |
|
panblue |
64 |
128 |
S |
|
panbook |
64 |
128 |
S |
|
panbord1 |
32 |
128 |
S |
|
panbord2 |
16 |
128 |
S |
|
pancase1 |
64 |
128 |
S |
|
pancase2 |
64 |
128 |
S |
|
panel1 |
64 |
128 |
S |
|
panel2 |
64 |
128 |
S |
|
panel3 |
64 |
128 |
S |
|
panel4 |
64 |
128 |
S |
|
panel5 |
64 |
128 |
S |
|
panel6 |
64 |
128 |
S |
|
panel7 |
64 |
128 |
S |
|
panel8 |
64 |
128 |
S |
|
panel9 |
64 |
128 |
S |
|
panred |
64 |
128 |
S |
|
pipe1 |
256 |
128 |
M |
|
pipe2 |
256 |
128 |
M |
|
pipe4 |
256 |
128 |
M |
|
pipe6 |
256 |
128 |
M |
|
pipes |
64 |
128 |
S |
|
pipewal1 |
64 |
128 |
S |
|
pipewal2 |
64 |
128 |
S |
|
plat1 |
128 |
128 |
S |
|
redwall |
128 |
128 |
S |
|
rock1 |
64 |
128 |
S |
|
rock2 |
64 |
128 |
S |
|
rock3 |
64 |
128 |
S |
|
rock4 |
128 |
128 |
S |
|
rock5 |
128 |
128 |
S |
|
rockred1 |
128 |
128 |
S |
|
rockred2 |
128 |
128 |
S |
|
rockred3 |
128 |
128 |
S |
|
sfall1 |
64 |
128 |
S |
|
sfall2 |
64 |
128 |
S |
|
sfall3 |
64 |
128 |
S |
|
sfall4 |
64 |
128 |
S |
|
shawn1 |
128 |
128 |
M |
|
shawn2 |
64 |
128 |
S |
|
shawn3 |
64 |
72 |
S |
|
silver1 |
64 |
128 |
S |
|
silver2 |
64 |
128 |
S |
|
silver3 |
64 |
128 |
S |
|
sk_left |
64 |
128 |
S |
|
sk_right |
64 |
128 |
S |
|
skin2 |
128 |
128 |
M |
|
skincut |
256 |
128 |
M |
|
skinedge |
128 |
128 |
M |
|
skinface |
256 |
128 |
M |
|
skinlow |
256 |
104 |
M |
|
skinmet1 |
256 |
128 |
M |
|
skinmet2 |
256 |
128 |
M |
|
skinscab |
256 |
128 |
M |
|
skinsymb |
256 |
128 |
M |
|
sksanke2 |
64 |
128 |
S |
|
sksnake1 |
64 |
128 |
S |
|
skspine1 |
128 |
128 |
S |
|
skspine2 |
256 |
96 |
M |
|
sky1 |
256 |
128 |
S |
|
sky2 |
256 |
128 |
S |
|
sky3 |
256 |
128 |
S |
|
sladpois |
64 |
128 |
M |
|
sladskul |
64 |
128 |
M |
|
sladwall |
64 |
128 |
S |
|
sloppy1 |
64 |
128 |
S |
|
sloppy2 |
64 |
128 |
S |
|
sp_dude1 |
128 |
128 |
S |
|
sp_dude2 |
128 |
128 |
S |
|
sp_dude4 |
64 |
128 |
S |
|
sp_dude5 |
64 |
128 |
S |
|
sp_dude7 |
128 |
128 |
S |
|
sp_dude8 |
128 |
128 |
S |
|
sp_face1 |
128 |
96 |
S |
|
sp_face2 |
64 |
128 |
S |
|
sp_hot1 |
256 |
128 |
M |
|
sp_rock1 |
128 |
128 |
S |
|
spacew2 |
64 |
128 |
S |
|
spacew3 |
64 |
128 |
S |
|
spacew4 |
64 |
128 |
S |
|
spcdoor1 |
64 |
128 |
S |
|
spcdoor2 |
64 |
128 |
S |
|
spcdoor3 |
64 |
128 |
S |
|
spcdoor4 |
64 |
128 |
S |
|
starbr2 |
128 |
128 |
M |
|
starg1 |
64 |
128 |
M |
|
starg2 |
128 |
128 |
M |
|
starg3 |
128 |
128 |
M |
|
stargr1 |
64 |
128 |
M |
|
stargr2 |
128 |
128 |
M |
|
startan2 |
128 |
128 |
M |
|
startan3 |
128 |
128 |
M |
|
step1 |
32 |
16 |
M |
|
step2 |
32 |
16 |
M |
|
step3 |
32 |
16 |
M |
|
step4 |
32 |
16 |
M |
|
step5 |
32 |
16 |
M |
|
step6 |
32 |
16 |
M |
|
steplad1 |
64 |
16 |
S |
|
steptop |
128 |
16 |
S |
|
stone |
256 |
128 |
M |
|
stone2 |
128 |
128 |
M |
|
stone3 |
128 |
128 |
M |
|
stone4 |
64 |
128 |
S |
|
stone5 |
64 |
128 |
S |
|
stone6 |
64 |
128 |
S |
|
stone7 |
64 |
128 |
S |
|
stucco |
64 |
128 |
S |
|
stucco1 |
64 |
128 |
S |
|
stucco2 |
64 |
128 |
S |
|
stucco3 |
64 |
128 |
S |
|
support2 |
64 |
128 |
M |
|
support3 |
64 |
128 |
M |
|
sw1blue |
64 |
128 |
M |
|
sw1brcom |
128 |
128 |
M |
|
sw1brik |
64 |
128 |
M |
|
sw1brn1 |
128 |
128 |
M |
|
sw1brn2 |
64 |
128 |
M |
|
sw1brngrn |
64 |
128 |
M |
|
sw1brown |
128 |
128 |
M |
|
sw1cmt |
64 |
128 |
M |
|
sw1comm |
64 |
72 |
M |
|
sw1comp |
64 |
128 |
M |
|
sw1dirt |
64 |
128 |
M |
|
sw1exit |
32 |
72 |
M |
|
sw1garg |
64 |
128 |
M |
|
sw1gray |
64 |
128 |
M |
|
sw1gray1 |
64 |
128 |
M |
|
sw1gston |
64 |
128 |
M |
|
sw1hot |
64 |
128 |
M |
|
sw1lion |
64 |
128 |
M |
|
sw1marb |
64 |
128 |
M |
|
sw1met2 |
64 |
128 |
M |
|
sw1metal |
64 |
128 |
M |
|
sw1mod1 |
64 |
128 |
M |
|
sw1panel |
64 |
128 |
M |
|
sw1pipe |
128 |
128 |
M |
|
sw1rock |
64 |
128 |
M |
|
sw1satyr |
64 |
128 |
M |
|
sw1skin |
64 |
128 |
M |
|
sw1skull |
64 |
128 |
M |
|
sw1slad |
64 |
128 |
M |
|
sw1starg |
128 |
128 |
M |
|
sw1ston1 |
64 |
128 |
M |
|
sw1ston2 |
128 |
128 |
M |
|
sw1ston6 |
64 |
128 |
M |
|
sw1stone |
128 |
128 |
M |
|
sw1strtn |
64 |
128 |
M |
|
sw1tek |
64 |
128 |
M |
|
sw1vine |
64 |
128 |
M |
|
sw1wdmet |
64 |
128 |
M |
|
sw1wood |
64 |
128 |
M |
|
sw1zim |
64 |
128 |
M |
|
sw2blue |
64 |
128 |
M |
|
sw2brcom |
128 |
128 |
M |
|
sw2brik |
64 |
128 |
M |
|
sw2brn1 |
128 |
128 |
M |
|
sw2brn2 |
64 |
128 |
M |
|
sw2brngrn |
64 |
128 |
M |
|
sw2brown |
128 |
128 |
M |
|
sw2cmt |
64 |
128 |
M |
|
sw2comm |
64 |
72 |
M |
|
sw2comp |
64 |
128 |
M |
|
sw2dirt |
64 |
128 |
M |
|
sw2exit |
32 |
72 |
M |
|
sw2garg |
64 |
128 |
M |
|
sw2gray |
64 |
128 |
M |
|
sw2gray1 |
64 |
128 |
M |
|
sw2gston |
64 |
128 |
M |
|
sw2hot |
64 |
128 |
M |
|
sw2lion |
64 |
128 |
M |
|
sw2marb |
64 |
128 |
M |
|
sw2met2 |
64 |
128 |
M |
|
sw2metal |
64 |
128 |
M |
|
sw2mod1 |
64 |
128 |
M |
|
sw2panel |
64 |
128 |
M |
|
sw2pipe |
128 |
128 |
M |
|
sw2rock |
64 |
128 |
M |
|
sw2satyr |
64 |
128 |
M |
|
sw2skin |
64 |
128 |
M |
|
sw2skull |
64 |
128 |
M |
|
sw2slad |
64 |
128 |
M |
|
sw2starg |
128 |
128 |
M |
|
sw2ston1 |
64 |
128 |
M |
|
sw2ston2 |
128 |
128 |
M |
|
sw2ston6 |
64 |
128 |
M |
|
sw2stone |
128 |
128 |
M |
|
sw2strtn |
64 |
128 |
M |
|
sw2tek |
64 |
128 |
M |
|
sw2vine |
64 |
128 |
M |
|
sw2wdmet |
64 |
128 |
M |
|
sw2wood |
64 |
128 |
M |
|
sw2zim |
64 |
128 |
M |
|
tanrock2 |
64 |
128 |
S |
|
tanrock3 |
64 |
128 |
S |
|
tanrock4 |
64 |
128 |
S |
|
tanrock5 |
64 |
128 |
S |
|
tanrock7 |
64 |
128 |
S |
|
tanrock8 |
64 |
128 |
S |
|
tekbron1 |
128 |
128 |
M |
|
tekbron2 |
64 |
128 |
S |
|
tekgren1 |
64 |
128 |
S |
|
tekgren2 |
64 |
128 |
S |
|
tekgren3 |
64 |
128 |
S |
|
tekgren4 |
64 |
128 |
S |
|
tekgren5 |
64 |
128 |
S |
|
teklite |
64 |
128 |
S |
|
teklite2 |
64 |
128 |
S |
|
tekwall1 |
128 |
128 |
M |
|
tekwall4 |
128 |
128 |
S |
|
tekwall6 |
256 |
128 |
M |
|
wood1 |
256 |
128 |
M |
|
wood10 |
128 |
128 |
S |
|
wood12 |
64 |
128 |
S |
|
wood3 |
256 |
128 |
S |
|
wood4 |
64 |
128 |
S |
|
wood5 |
256 |
128 |
M |
|
wood6 |
64 |
128 |
M |
|
wood7 |
64 |
128 |
M |
|
wood8 |
64 |
128 |
S |
|
wood9 |
64 |
128 |
S |
|
woodgarg |
64 |
128 |
M |
|
woodmet1 |
64 |
128 |
S |
|
woodmet2 |
64 |
128 |
S |
|
woodmet3 |
64 |
128 |
S |
|
woodmet4 |
64 |
128 |
S |
|
woodvert |
64 |
128 |
S |
|
zdoorb1 |
128 |
128 |
S |
|
zdoorf1 |
128 |
128 |
S |
|
zeldoor |
128 |
128 |
S |
|
zimmer1 |
64 |
128 |
S |
|
zimmer2 |
64 |
128 |
S |
|
zimmer3 |
64 |
128 |
S |
|
zimmer4 |
64 |
128 |
S |
|
zimmer5 |
64 |
128 |
S |
|
zimmer7 |
64 |
128 |
S |
|
zimmer8 |
64 |
128 |
S |
|
zzwolf1 |
128 |
128 |
S |
|
zzwolf10 |
128 |
128 |
S |
|
zzwolf11 |
128 |
128 |
S |
|
zzwolf12 |
128 |
128 |
S |
|
zzwolf13 |
128 |
128 |
S |
|
zzwolf2 |
128 |
128 |
S |
|
zzwolf3 |
128 |
128 |
S |
|
zzwolf4 |
128 |
128 |
S |
|
zzwolf5 |
128 |
128 |
S |
|
zzwolf6 |
128 |
128 |
S |
|
zzwolf7 |
128 |
128 |
S |
|
zzwolf9 |
128 |
128 |
S |
|
zzzface1 |
256 |
128 |
S |
|
zzzface2 |
256 |
128 |
S |
|
zzzface3 |
256 |
128 |
S |
|
zzzface4 |
256 |
128 |
S |
|
zzzface5 |
256 |
128 |
S |
|
zzzface6 |
256 |
128 |
S |
|
zzzface7 |
256 |
128 |
S |
|
zzzface8 |
256 |
128 |
S |
|
zzzface9 |
256 |
128 |
S |
End of section
Appendix F: Utilities and Documents
There are quite literally hundreds of Doom editing utilities and documents available to you. The Doom Archive at Walnut Creek, aka CDROM.COM, is the world's repository of all things Doom. You may browse the anonymous FTP Doom archives here:
ftp://ftp.cdrom.com/public/games/idgames/
The above URL is to the main Doom archive site. This site is usually very busy, and you may have trouble logging on. To reduce the load on the main archive site, please find and use a mirror site. The list of mirror sites may be found here:
http://www.cdrom.com/pub/idgames/docs/rgcd-pips/FTP_WWW_sites.html
For reviews of all major (and quite a few minor) Doom utilities, try this site by Jan-Albert B. van Ree:
http://www.gamers.org/~javanree/dmedit16.html
Editors
The editor is the essential software tool you must have to create levels for Doom. The two available here are the editors that the authors of The Unofficial WAD Designers' Handbook use. We know these editors to be good ones, but this is not to say they will necessarily suit you.
|
Download |
Size |
|
440K |
|
|
583K |
Node Builders
Node builders process the raw level information created by editors into playable game data files. These stand-alone node builders are far superior to the node builders included with most level editors. At the time of this writing, the most highly recommended node builder is BSP, as it has been updated to reduce visplane errors and other potential problems. ZenNode is also a fine node builder.
|
Download |
Size |
|
170K |
|
|
252K |
Reject Table Builders
The reject table is created by node builders as part of the processing that they do. However, most node builders generate an empty reject table that performs no useful function. RMB is an outstanding external reject table builder that builds an optimized reject table for your WADs. This can help speed up your levels as well as correct certain oddities in monster behavior. The authors feel that no level should be released to the public without first being processed by RMB.
|
Download |
Size |
|
169K |
TCount
TCount is a utility that was developed to help Doom level authors gauge the difficulty of their levels on the various skill settings. Not all players are of the same skill, and all level authors who wish to provide an excellent playing experience to the most people will include well-considered skill levels in their WADs. This utility will analyze your level and give you a report of the ratio of health to armor to ammo to monsters. Using this information, you may more accurately judge if your level has appropriate skill levels.
|
Download |
Size |
|
42K |
Example WADs
The best way to learn how to be a good Doom level author is to play a lot of levels, observing what works and what doesn't. With Doom, you can load levels that others have written into your editor to see exactly how the author built a structure or accomplished an effect. This makes every WAD available a potential learning tool. Here are two outstanding examples of good Doom levels. Warren Marshall's 99 Ways to Die is perhaps the best example of lighting available. 3X-PLAY by Bill McClendon is an example of "key switching" skill settings, where the difficulty settings are used to provide a very different play experience on different skill settings. Oh, by the way, these levels were not written just as examples, they are great levels to play too!
|
Download — for Doom 2 only! |
Size |
|
217K |
|
|
54K |
Documents
There are a couple of classic Doom editing documents that are generally considered required reading for any Doom level author. These documents are referenced in this Handbook. Do yourself a favor and download these reference works. They are both fairly technical in places, but you will find them to be invaluable resources as you learn.
|
Downloads |
Size |
|
60K |
|
|
Managing Textures and the "Unpegged" Attribute by Scott Amspoker |
5K |
End of section
Feedback
The authors of The Unofficial WAD Designers' Handbook welcome your comments and suggestions. We will also attempt to answer your Doom editing questions.
Ron is the webmaster for the Handbook web site, so please direct any comments or suggestions about the web site to him.

|

|